This article explains how to build your own integration between Lightico and a third-party service. Once you’ve created the integration in the custom integration builder, you can include the service as a step in a Workflow.
To read about Lightico built-in integrations, see the Built-in integrations section of our documentation.
What can you do with a custom integration
You may require a third-party service to enable your customers to complete their journeys. For example:
Currency conversion when processing a sale
Generating an insurance quote based on information provided by the customer
Calculating a loan payment schedule
Currently, you may use these services outside of a Lightico session. However, the power to fully complete customer journeys is when you can include all the elements of the journey in one continuous Workflow. This is the best way to track and standardize your journeys and keep the customer engaged until the finish line. A custom integration enables you to provide data or to update another platform within the same Workflow where customer is signing and completing application documents.
How does it work
Using your credentials for the third-party service you will build a custom integration in Lightico. You then define API endpoints according to the endpoints defined by the service, using Lightico Attributes to provide parameter values. Once the responses are received they are bound to Attributes and the information provided by the service becomes easy to use in a session.
Who builds the integration
Lightico provides a no-code interface for building the integration. However, a basic understanding of your third-party service and how to work with an API are needed. The assistance of a technical administrator who researches the abilities of the required service may be required. A Business Configurator (BC) could then be guided by the technical admin when building the integration.
Building a sample custom integration
In the following example we will build an endpoint to retrieve an insurance quote for our customer.
To build a custom integration:
In Lightico Settings, navigate to the Integrations page and open the Custom integrations tab.
Click Create new.
The Create new integration window appears.Enter a name and description (optional) for this integration.
Enter your username and password credentials for the third-party service.
Click Save.
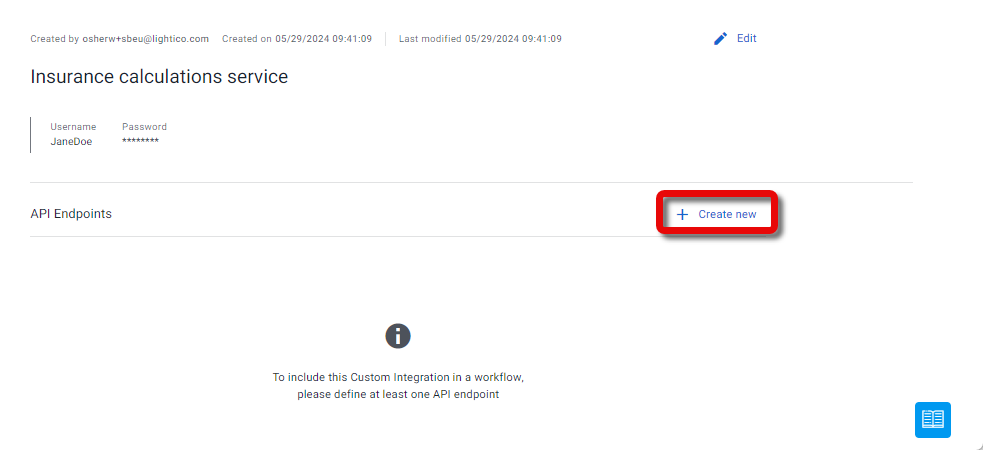
Your new integration hub opens.
Next to API Endpoints, click Create new.
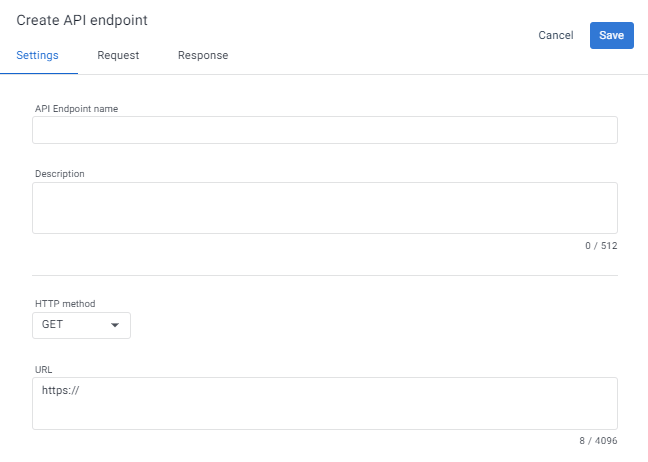
The Create API endpoint window appears.
In the Settings tab, configure the following general settings:
Enter a name and description.
Select an HTTP method.
Enter the URL.
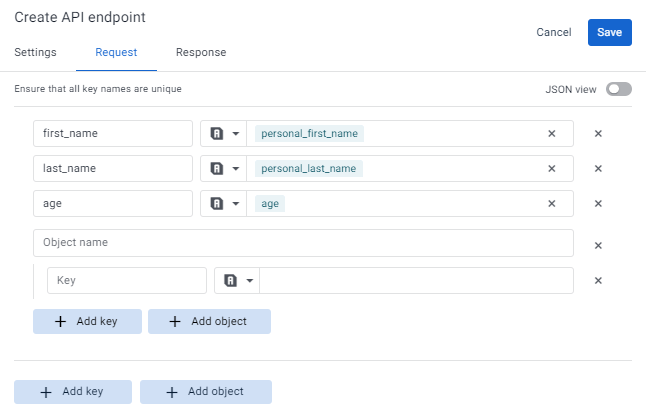
In the Request tab, use the following elements to construct the outgoing request from Lightico to the third-party service:
Click Add key to add a key:value pair. key = name of the third-party API request parameter; value = Lightico Attribute
Click Add object to add a JSON object.
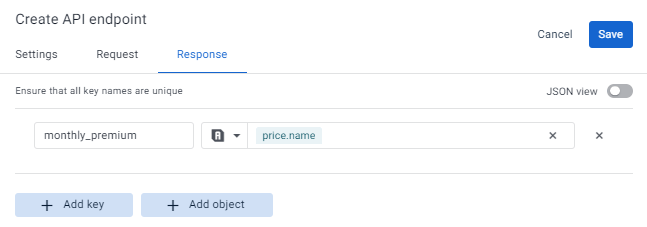
In the Response tab, use the following elements to process the synchronous response:
Click Add key to add a key:value pair. key = name of the third-party API response parameter; value = Lightico Attribute to which you’d like to attach this response
Click Add object to add a JSON object.
Tip
Click JSON view to see the request or response in JSON format.
Click Save.
The integration is built and the endpoints will be available for adding to a Workflow.
On the right side of the page, you can view the request and response that you created for each endpoint.

.PNG)


.PNG)