This article explains how to add users to your Lightico account and how to define their access to different parts of your Lightico platform using roles.
Add users
To add a user to your Lightico account:
In the Lightico Admin Center, go to the User Management page.
In the Users tab, click New User in the top right corner.
The Create user dialog appears..png)
Enter an email address for the username.
Select a Main team and one or more Secondary teams.
A user’s team defines session settings, branding, and access to assets. For more information, see Define unique team settings.You can enter the following optional fields: First name, Last name, Employee ID, Phone number.
Note
The Employee ID field supports only ASCII characters (A–Z, a–z, 0–9, and basic symbols). Accented or non-Latin characters are not supported.
In the Password field, enter a password and then confirm the password in the Confirm password box.
Password requirements:
8+ characters
At least one uppercase (A-Z)
At least one lowercase (a-z)
At least one digit (0-9)
At least one symbol
Does not contain portion of login email before the @ symbol
In the right pane, select one of the User activation options:
Yes - The user can access the system based on their settings and permissions
No - The user is inactive and cannot access the system.
Limited time - Define until when the user is active.
Select a user role (see below).
Click Save.
The user is created.
Edit a user
To edit a user:
Double-click the user in the user list.
.png)
The Edit user dialog opens.From the Role list, select a role.
Click Save.
User roles
After you have created a user, you can assign the user a role. Roles define to which parts of the platform a user has access.
There are two types of roles:
Standard user roles
Standard user roles are defined by Lightico and cannot be edited.
The following standard user roles are listed below from least to most access:
Agent – Runs Lightico sessions and has access only to the Collaboration Room.
Team supervisor – Manages activity of teams. Has access to Team and user data, but not settings.
User admin - Creates teams and users.
Business configurator – Creates and manages assets.
Profile admin - Overall admin with full access to the entire platform.
The following table shows features and which standard user roles have access to them.
Features | Agent | Team supervisor | User admin | Business configurator | Profile admin |
Agent console | ✅ | ✅ | ✅ | ✅ | |
Usage reports & session history | ✅* | ✅ | |||
Dashboard analytics | ✅* | ✅ | |||
Create and edit users | ✅ | ✅ | |||
Create and manage assets (workflows, forms, PDF templates, Dynamic Documents, document requests) | ✅ | ✅ | |||
Team and System settings | ✅ |
*For the user’s team only
Create custom user roles
If you find the need to define different levels of access than provided in standard roles, you can create your own. Creating your own entails defining a name and selecting to which parts of the platform this role will have access.
To create custom user roles:
In the User management page, in the Roles & permissions tab, click Create role.
The role creation page appears.On the right side, enter a name and description for the new role.
On the main part of the page, under Permissions, toggle on any features that you will enable for this new role.
Click Save at the top of the page.
.png)
The new role is saved and appears in the list on the Roles & permissions tab..png)
Upload users in bulk
You can upload multiple users using a CSV file.
To upload users in bulk:
In the Admin Center, go to User management.
Click the main options menu and select Download users Template.
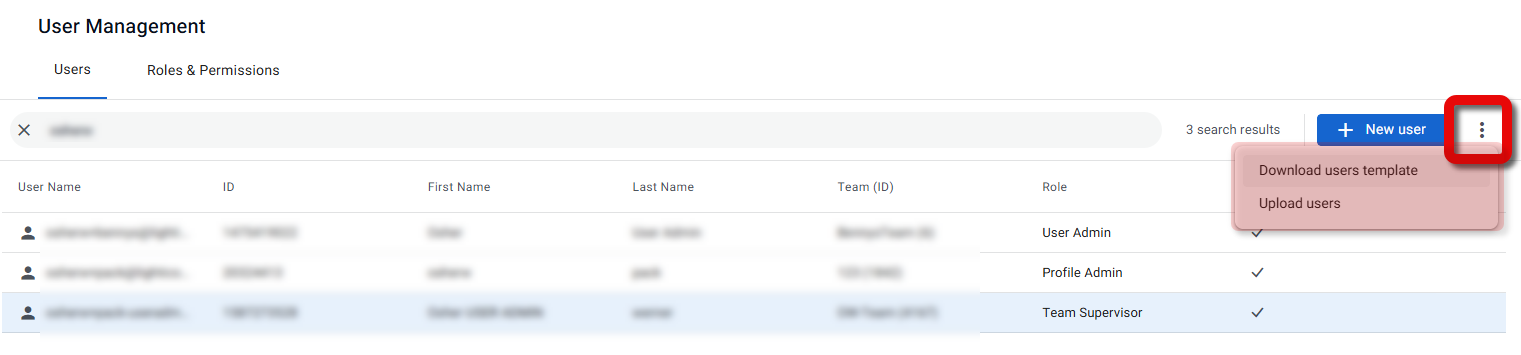
See the on-screen instructions for filling out the template and click Download.Complete the template and save it to your local drive.
Click options menu and select Upload Users in the top right corner and upload the csv file you just created.
Click Upload.
Reset a user password
If you have permissions for user management, you can reset a password for another user.
To reset a password:
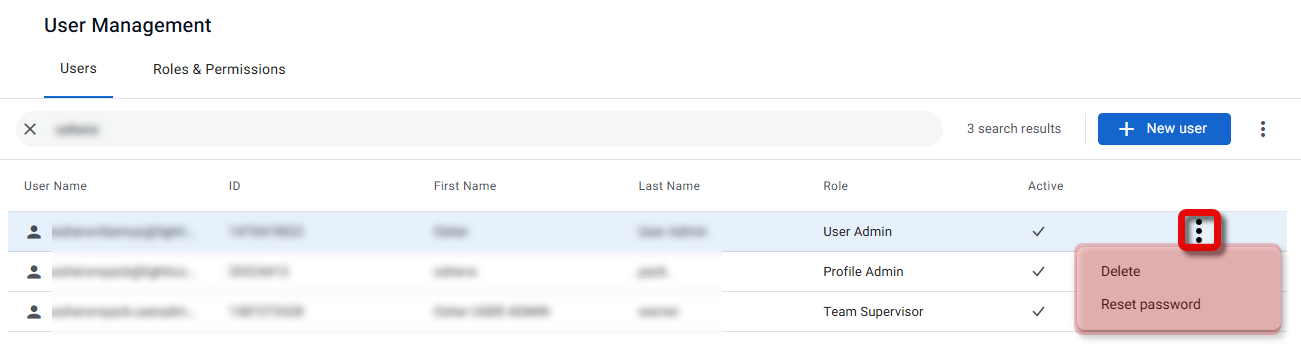
In the Admin Center, go to User management.
Find the relevant user, click the options menu and select Reset password.
The Reset password dialog appearsEnter your own login username and password and click Send.
.png)
The Reset user password dialog appears.Enter the new password and click Reset.
.png)
Reset your own password
Any user can reset their own password by clicking Forgot password? on the login page.
.png)