The campaign tool enables you to send out multiple instances of a preplanned session to a contact list.
In this article you'll learn how to:
Create and run a campaign
Outline
Here is an outline of the steps for creating and running a campaign:
Create a campaign file - Create a CSV file with each contact name and a phone numbers and/or email. Optionally you can also define attributes for each contact.
Create a Workflow - The Workflow must not require any agent or additional participant actions.
Configure the campaign - Upload the campaign file and configure a few campaign settings.
Launch the campaign - Initiate the process of sending out the Workflow to your contacts and follow the campaign's progress.
Create a campaign file
The campaign file contains the contact information for all customers that you will include in the campaign.
To create a campaign file:
Open a new worksheet and name the first three columns “customerName”, “phone”, “email”. These columns are mandatory.
Transfer all contacts into these rows. You can include up to 50,000 contacts.
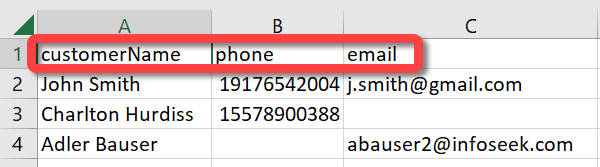
If desired, create columns for attribute values.

Save the worksheet as a CSV UTF-8 file.
Note
The CSV format causes Excel to encode number columns making them incompatible with the Campaign tool. If this happens, format the column as text.
The following constraints apply when creating the CSV file:
First three columns are mandatory and must be named: “customerName”, “phone”, “email”.
Additional columns are optional and are named for existing attributes.
Each row must contain a customerName and either a phone, or email, or both.
Attribute values may be left blank.
No empty rows allowed.
Create a Workflow
The Workflow you create must be able to get started without a human agent. A campaign is most effective when the entire Workflow is designed to let your customer complete it entirely on their own.
To create a Workflow, see Create Workflows.
Configure the campaign
To configure the campaign:
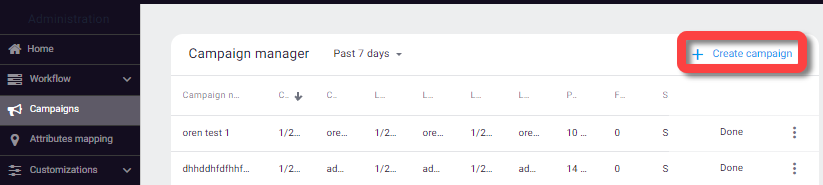
On the Lightico Administration page, in the left pane, click Campaigns.
The Campaign manager page opens.Click Create campaign.
 The campaign configuration window appears.
In the main section of the window:
Enter a Campaign Name.
Under Upload a campaign file, click Select file and select the campaign CSV file that you created.
Under Campaign setup, select a team for the campaign. The selected team settings will apply to the sessions created in the campaign.
Select the Workflow that you created for the campaign.
Enter a description of the campaign (optional).
Turn on the Store draft in external storage toggle (optional). See below for more information.
.png")
In the right panel:
Under Schedule execution routine, select the days, time range and time zone when to allow customer invitations to be sent out.
Under Notification, select who you would like to notify when the campaign is completed. The email includes a detailed report of the campaign execution (see below).
If you selected Someone else, enter up to 10 emails in the field that appears.
.png "image(136).png")
Click Save campaign in the top right corner.
.png "image(137).png")
The Campaign manager page appears with the new campaign added to the table.
Store draft in external storage
Campaigns sometimes do not reach the recipient or the recipient may receive the Workflow, but not complete it. Because of possible cases like these, you can choose to save a copy of every Workflow sent during a campaign. When the campaign begins, an initial copy is created for each recipient and sent to external storage. The copy can be used as a record that a document was sent to the customer even if they did not complete it.
To store a draft of each Workflow in the campaign:
Turn on the Store draft in external storage toggle when you configure the campaign.
Notes
A separate file is created for every HTML and PDF included in the Workflow unless your system settings are set to combined PDF.
Normally, draft documents are replaced by the completed document, in the case of drafts created before a campaign, copies continue to be saved even after the document is completed.
Tip
We recommend defining a watermark for all incomplete documents to make it clear that they are drafts and not completed. See Allow agents and customers to download incomplete documents.
Launch the campaign
Launching the campaign initiates sending out the Workflow to all your contacts. The amount of time it takes to complete the campaign depends on how many contacts are included in it.
To launch the campaign:
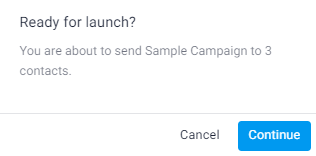
Click Launch next to the relevant campaign.

Click Continue to approve the launch. The pop-up lets you know how many contacts are in the campaign.
Follow the progress of the campaign in the Campaign manager table.

Click Pause to pause the campaign.

Click Resume to continue.

When the campaign is finished running, the Status column will show Done.
Edit and monitor your campaigns
Search for campaigns
Search for campaigns according to recent timeframes or use the advanced filter.

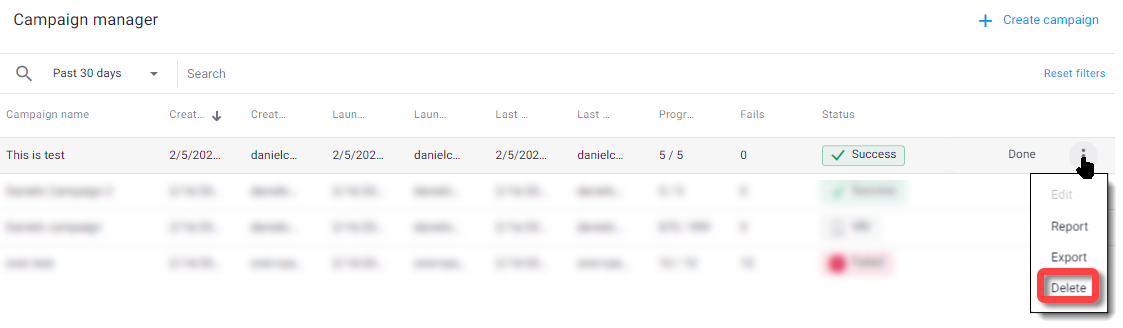
Delete a campaign
You can delete a campaign at any point in the progress of the campaign.
To delete a campaign:
If the campaign has been launched, click Pause.
Click the menu icon and select Delete.
Edit a campaign
You can edit a campaign when it is in New status, before it is launched. Once it's has been launched, only the description can be edited.
To edit a campaign:
Click the menu icon and select Edit.
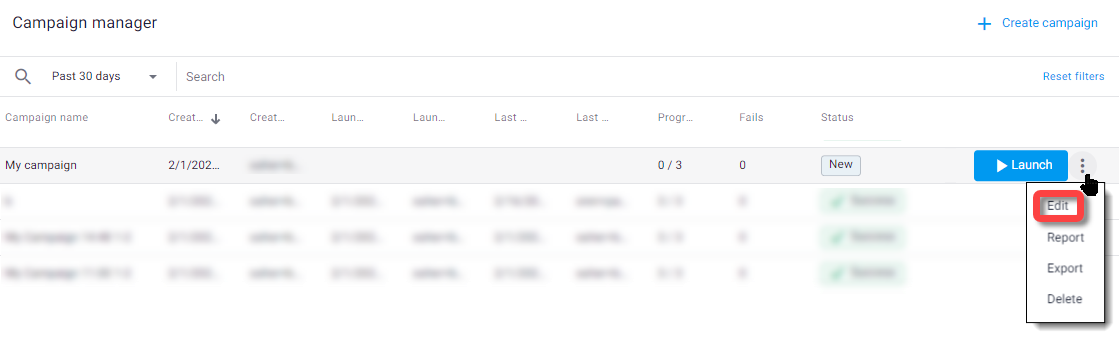
The Edit campaign window appears.
Edit the campaign as needed.
View Report
At any point in the campaign, you can view a campaign report.
Click the menu for the relevant campaign and select Report.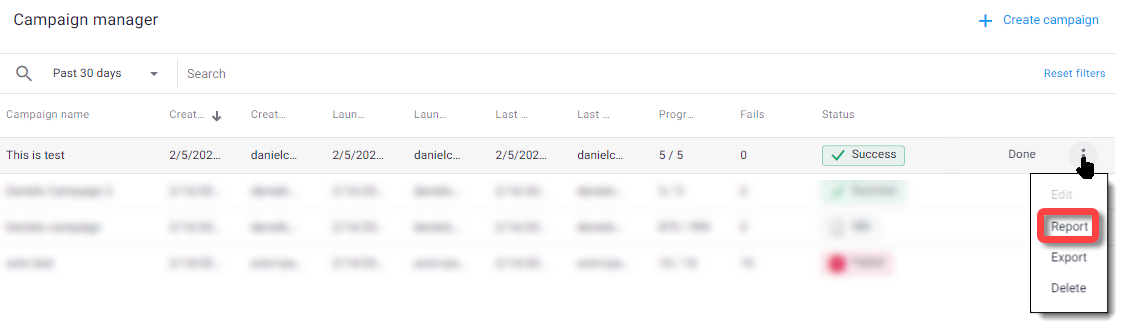
The report is displayed. 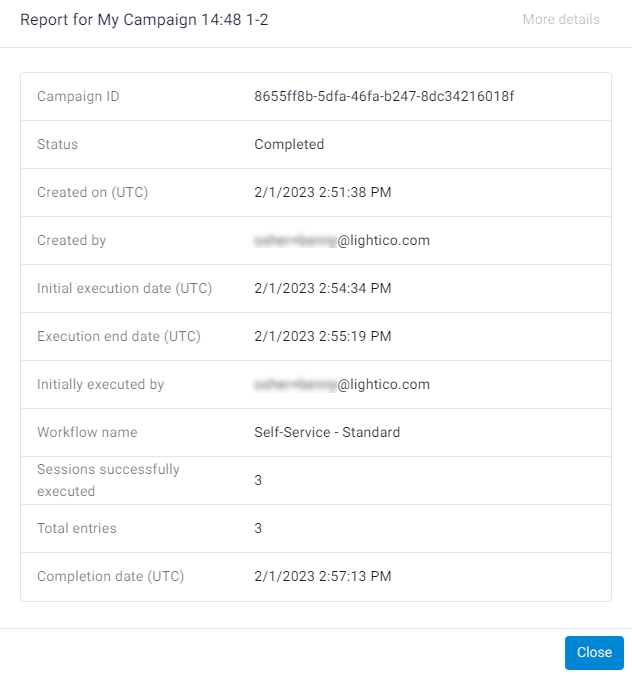
Note:
Reports that contain all user action on campaigns are available in the Reports > Audits page.
Export the CSV file
At any point in the campaign, you can export a copy of the CSV file for a campaign.
Click the menu for the relevant campaign and select Export.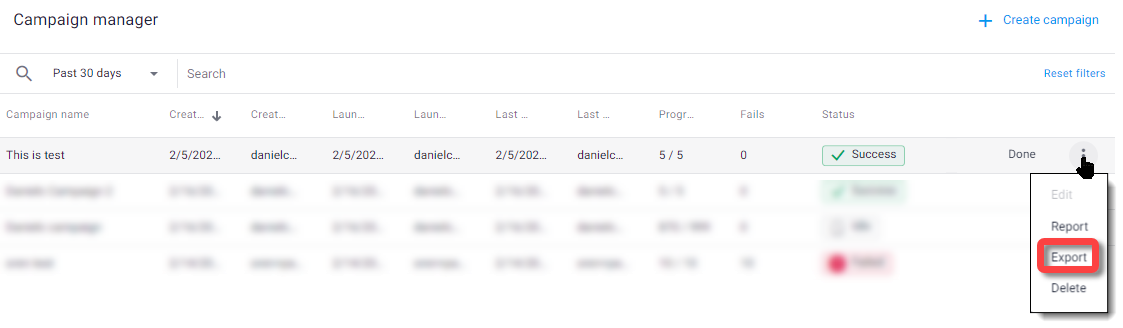
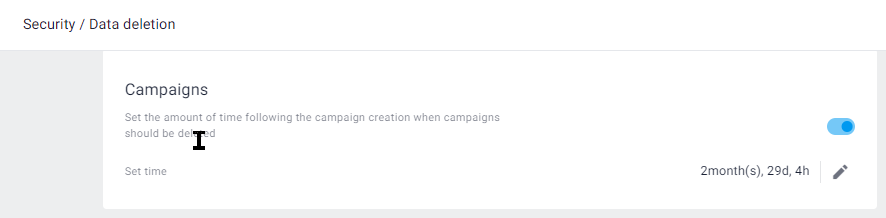
Set data deletion rule
Campaigns may contain sensitive or private information. To help protect this data, you can limit the amount of time that it remains in the Lightico system.
In System settings, under Security > Data deletion > Campaigns, turn on the toggle and set the amount of time following creation of a campaign after which the campaign's data will be deleted.