Create Workflows
  • 04 Feb 2024
  • 7 Minutes to read
  • Dark
    Light
  • PDF

Create Workflows

  • Dark
    Light
  • PDF

Article Summary

In this article you'll learn about the following steps of creating a Workflow: 

  • Create a new Workflow - How to start creating a Workflow, add and connect items, and save it.

  • Add customer journey items - Set up the main building blocks of the customer journey: Forms, PDF templates, Dynamic Documents, and document requests.

  • Add verification items - Qualify your customer with photo ID and phone verification steps.

  • Add conditional items - Automate how the Workflow behaves, based on customer inputs using switches, condition hubs, and functions.

For an introduction to Lightico Workflows, see Getting started with automated Workflows.

🎦 Watch related video:

Create a new Workflow

To create a new Workflow:

  1. In the Lightico Administration page, in the left pane, click Workflow > Workflow. The Workflow directory page opens.

  2. Select an existing folder in the left pane or click the new folder button to create a new folder.

  3. Click the new Workflow button.

  4. Enter a name for your Workflow and click Launch.

    A new Workflow canvas opens.

  5. Add items to your Workflow in one of the following 2 ways:

    • From the right pane, under Add Item, drag the item to the desired location on the canvas.

    • On the canvas, right-click the desired location and select the relevant item from the menu.

    For specific details about adding and configuring each item, see the next section

  6. Connect your Workflow items by selecting the first item and dragging a connector line to the second item.

    To delete the connector, select it, and then click the red x.

  7. Add an End item to the end of your flow by dragging the End item to the canvas and connecting the last step to the End Item

  8. Click Publish.

    Note:

    To save a draft without making the changes available to agents or to save changes without publishing them, click Save Draft.
    Also, see Restoring a previous version.

Duplicate a Workflow

You may need to create a new Workflow based on a previously designed one. You can easily do this by creating a copy of the original and editing it. 

To duplicate a Workflow:

  1. In the Workflow directory page, select Duplicate from the menu of the Workflow to be duplicated.
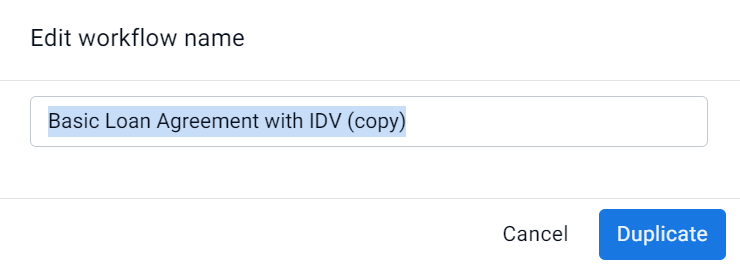


    The Edit Workflow name window appears.

  2. Change the Workflow name if desired and click Duplicate.


    The file is duplicated and appears in the directory.
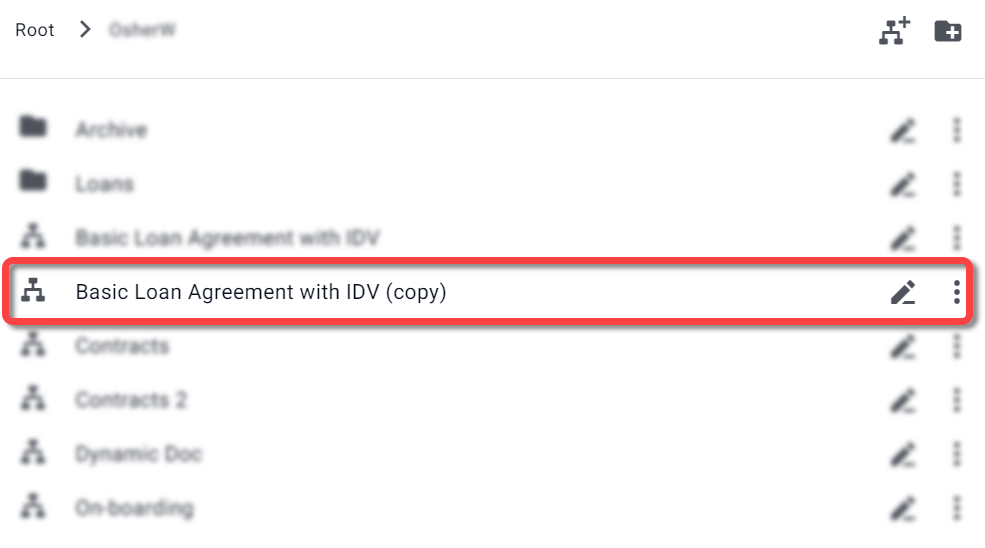

Add customer journey items

The different types of items that can be added are:

Form

Forms are used to capture customer information during a Workflow.

For information about creating Forms, see Create Forms.

To add a Form to your Workflow:

  1. Add the Form item to the canvas.


    The Add Item window appears.

  2. Select the Form you want to add, and click Add

    -OR-

    Click Create and create a new Form in the Form designer.


    The Form is added to the canvas.

After the Form item is added to the Workflow, you can select it and edit it as follows:

  • Duplicate, replace, delete the Form - Click the 3 dots and select the relevant action from the context menu.

  • Rename this Workflow step - Click the 3 dots and click the Step Name in the context menu and edit it.

Note:

The step name is displayed for the agent and customer in a session.

  • Edit the original Form - click the edit icon.

  • Assign the Form to the agent - Select Agent from the dropdown to require the agent, rather than the customer to fill in the Form before the Workflow is added to the session.

    Note:

    You can only define an agent Form if it is the first step in the Workflow.

PDF template

PDF templates are PDF files that are enhanced in the Lightico PDF Builder to enable various actions, including inserting customer data, signing the document, and adding additional participants. 

For more information about creating PDF templates, see New PDF Builder: Getting started with the PDF Builder.

To add a PDF template to your Workflow:

  1. Add the PDF item to the canvas.


    The Add Item window appears.

  2. Select the PDF template you want to add, and click Add

    -OR-

    Click Create and create a new PDF template in the PDF Template Builder.
     
    The PDF is added to the canvas. 

After the PDF item is added to the Workflow, you can select it and edit it as follows: 

  • Duplicate, replace, delete the template - Click the 3 dots and select the relevant action from the context menu.

  • Rename this Workflow step - Click the 3 dots and click the Step Name in the context menu and edit it.

  • Edit the original PDF template - click the edit icon.

  • Replace the PDF template Form - Turn off the Show PDF's Form toggle (see Replace the PDF or overlay template Form in a Workflow).

Note:

The following is not currently supported for inclusion in Workflows: 

  • PDFs where the agent must add a corporate stamp

Dynamic Document

In Dynamic Documents, you can incorporate conditions and business logic to determine how the document appears to your customers. Within a Workflow, the dynamic document is rendered as a PDF and you can define whether or not to send the PDF to customers for approval and download. 

For information about creating Dynamic Documents, see Create dynamic documents.

Note:

Dynamic documents can only be used in a customer Workflow when at least one section of the document is bound to a Form. For more information, see Design dynamic documents.

To add a Dynamic Document to your Workflow:

  1. Add the Dynamic Doc item to the canvas.


    The Add Item window appears.

  2. Select the Dynamic Document you want to add, and click Add

    -OR-

    Click Create and create a new Dynamic Document in the HTML Designer.


    The Dynamic Document is added to the canvas. 

After the Dynamic Document item is added to the canvas, you can select it and edit it as follows:

  • Duplicate, replace, delete the template - Click the 3 dots and select the relevant action from the context menu.

  • Rename this Workflow step - Click the 3 dots and click the Step Name in the context menu and edit it. 

  • Send the rendered PDF to the customer - Click the Send to customer drop down and select Send or Don't Send.
     

  • Edit the original Dynamic Document - click the edit icon.

Document Request

As part of a Workflow, agents can request documentation, such as financial statements and driver’s licenses, from customers. Agents can collect multiple documents during a single document request step. 

You can add photo ID documents to a Document Request Workflow step that include data extraction. Extracted data is mapped to Attributes and can be used for other parts of the Workflow or session. 

For information about creating a document request, see Create document requests.

To add a photo ID that includes authentication as well as data extraction, see the next section.

To add a document request to your Workflow:

  1. Drag the Document Request item from the right pane. The Document request dialog box opens.

    If the document includes data extraction, an icon is displayed next to the document. You can click on the icon to see which Attributes are bound to the extraction results.

  2. Select the documents that you want to request from the customer and click Done.

    The Document Request item is added to the canvas and displays the number of documents you included in that step.

  3. After adding the Document Request item to the Workflow canvas, you can select it and edit it as follows:

  • Edit the requested documents - Click the edit button and select a new document from the Document Request dialog box.

  • Duplicate or delete the document request step - Click the 3 dots and select the relevant action from the context menu.

  • Rename this Workflow step - Click the 3 dots and click the Step Name in the context menu and edit it. 

External (ad hoc) document

You can create a Workflow that includes documents that are uploaded on the fly during a Lightico session. The External Document item provides a designated space for the required PDF documents in the Workflow. Agents are prompted to upload the necessary documents before sending the Workflow to customers. 

See Add external documents in a Workflow, for more information.

Payment

Add a payment item to your Workflow to seamlessly collect payments within the context of your customer journeys.

For more information, see Add a payment step to a Workflow.

Add verification items

Verification items enable you to verify the identity of the customer and determine whether or not they are qualified to proceed with the steps that follow.

You can add the following types of verification items to a Workflow: 

  • Photo ID Verification

  • Phone Verification

For more information, see Customer verification as a Workflow step.

Add conditional items

Conditional items enable you to control how the Workflow behaves, based on customer inputs. For example, present different versions of a contract to customers according to the state that they live it, or end the session for underage customers.

You can add the following types of conditional items to a Workflow:

  • Switch - Splits the Workflow into multiple paths arranged according to priority. The customer is guided down the first path for which they meet its conditional terms.

  • Condition Hub - Creates a hub of multiple Workflow paths.  Customer is guided down every path for which they meet the its condition terms.

  • Function - Derive new information about the customer from existing data. For example, calculate the age of the customer from their date of birth. Use the result of the function in a subsequent step in the workflow.

For more information, see Add conditional Workflow items.

Restoring a previous version

Every time you publish a Workflow, a new version is created and the previous version is saved. You can view all version information in the Version history tab on the right side of the Workflow designer.

To restore a previous version:

  1. Click the version you would like to restore.


    The selected Workflow appears on the canvas.

    Note:

    If you have unsaved changes, you'll be asked to save them before you exit.


Was this article helpful?