This article explains how to configure a case type to guide agents through a structured series of tasks.
Each task is built on a Workflow you create in the Admin Center and is designed to help agents collect and organize customer information efficiently. Once your Workflows are ready, you can combine them into a case that reflects your business process from start to finish. For help creating Workflows, see Create a Workflow for a case task.
Configuring a case type
To configure a case type:
In the Admin Center, click Cases.
The Cases page opens.Click + Case type.
.png)
Name your new case and click Done.
.png)
The new case opens.
Type a title and description (optional) for your first task.
The description field has a 250-character limit.
Click Select Workflow.
.png)
The Select Workflow window appears.Navigate to and select the Workflow you’d like to associate and click Select.
.png)
If required, create a condition for enabling this task. See below.
Click Create new task to add another task to the case.
Add as many tasks as required for this case type.
Click Publish.
The case becomes available to case agents, but must be associated with a team before they can access it in Case Manager.
Edit a Workflow in a task
After associating a Workflow to a task, click Edit to open it in the Workflow builder.
This lets you view and update the Workflow directly from the case type, without searching for it separately.
.png)
Delete a case type
To maintain a clean and accurate environment, administrators can delete case types that are no longer needed. This action is performed directly within the case type builder.
What happens when a case type is deleted?
It is important to understand the impact of deletion on your existing data and active workflows:
In-flight and completed cases: Deleting a case type does not delete the cases themselves. Any existing cases created from that type will remain visible in Case Manager and continue to function normally until they reach their end-state.
Case creation: Once deleted, the case type is removed from the "Create new case" options for all users. You cannot restore a deleted case type; you would need to rebuild the structure manually.
Team access: The system automatically removes the association between the deleted case type and any assigned teams.
Configuration cleanup: Deletion is permanent and helps ensure that agents only see the most relevant and up-to-date case structures.
Note
We recommend verifying that no automated external integrations are specifically calling for a Case Type ID before you proceed with deletion.
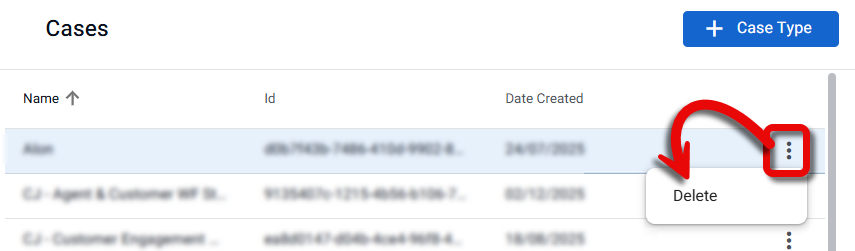
To delete a case type:
In the Cases page, click the three-dot menu for the relevant case and select Delete.
Configure task behavior
When configuring a case, you can control how each task behaves in the Case Manager UI by applying conditions. Task conditions determine whether a task is:
Available to open (Disabled behavior)
Editable (Read-only behavior)
Visible (Hidden behavior)
All behaviors use the same condition framework but control different aspects of task behavior.
Task behavior types
Editable (default)
The task can be opened and edited at any time.
Read-only (controls editability)
The task can always be opened and viewed.
The task cannot be edited until the condition is met.
Use this to keep tasks visible for context while controlling when changes are allowed.
Disabled (controls access)
The task appears in the task list
The task cannot be opened until the condition is met.
Use this to control when a task becomes accessible in the process.
Hidden (controls visibility)
The task is hidden from the agent's task list by default.
The task appears only when the condition is met.
Use this to remove tasks entirely from the agent's view until they become relevant.
Note
If more than one behavior rule is configured on a task, the bottom-most rule takes precedence.
How task conditions work
Conditions are configured per task in the case type builder.
Conditions are evaluated continuously in real time.
Evaluation is based on case data, such as:
Case state
Attributes (including values collected in previous tasks)
Ownership and system values
When a condition evaluates to true, the defined behavior is applied immediately.
Examples of task behavior conditions
The following are examples of how conditions might be used:
Collecting dependent details only when selected
In an insurance enrollment process, a Dependent details task is configured as Disabled until a "Include dependents" checkbox is selected. When the customer selects Yes, the task becomes accessible; when No, it stays locked.
Locking income details after a mortgage reaches decision stage
In a mortgage onboarding process, an Income information task is configured as Read-only once the case leaves Verification. Agents can edit the task during early stages; once the case reaches Decision, it locks automatically.
Hiding review tasks until a case is escalated
In a lending process, supervisor review tasks are configured as Hidden until the case reaches a Priority Review state. Agents working earlier stages never see them; they appear only when the escalation condition is met.
Configure task behavior
In the Admin Center, on the Cases page, open the case and select the task you want to configure.
Under Condition rules, turn on the toggle for the behavior you want to control (Read-only, Disabled, Hidden).
.png)
The condition dialog opens.Build the condition:
Select a field type (Attribute or system value)
Choose the field
Select an operator (for example: equal to, not equal to, contains)
Enter or select the value
(Optional) Click + to add additional clauses and combine them using AND/OR.
Click Save.
.png)
The task behavior updates dynamically based on the condition.
Examples of conditions
Attribute-based (Boolean):
include_dependents = true
State-based (System value):
CASE_STATE_NAME = Verification
Allow agents to re-send a task
You can allow agents to re-send a customer-facing task when a submission needs to be corrected.
Turn on Allow agents to resend workflow in the task settings..png)
When enabled:
Agents can re-send the task to the customer from Case Manager
The same task is sent again for completion in the Collaboration Room
Configuration rules:
Available only for customer-facing tasks
Not available for internal (agent-only) tasks
When disabled, the re-send option is not available to agents
Use this setting for tasks where customers may need to resubmit information, such as document uploads or form completion.
Q & A
Do I need to configure Workflows before creating a case type?
Yes. Each task in a case is based on a predefined Workflow, so you should create all required Workflows first.
Can I reorder tasks in a case type after creating them?
No. Currently, tasks appear in the order they were added. To change the order, you need to remove and recreate tasks.
How can I temporarily save a case that has issues?
Click Save draft, but remember to click Publish when you have worked out all the issues so that the most updated version of the case will be available for use.
Can I add a condition to all tasks?
You’ll need one initial task that is enabled when the agent starts the case. Then, you can add a condition to any task based on values captured earlier in the case.