A case consists of a series of tasks for an agent to complete. Some tasks require the agent to initiate direct customer involvement, while others are completed solely by the agent. The basis for a task, is a Workflow created in the Lightico Workflow builder where collaboration session Workflows are built.
Currently, you can create the following types of task Workflows:
Data capture
Customer engagement
Document generation
Attention
Each of the case types is based on a Workflow with specific requirements. This article explains the requirements for each type of Workflow and refers you to articles in other parts of the Lightico Help Center for full instructions. Please follow the requirements carefully when constructing the Workflows so that they will be suitable for including in a case.
Data capture Workflow
A data capture Workflow contains the following items only:
Agent Form
Condition hub
To build a data capture Workflow follow these steps:
Step 1: Build a Form
Create a Form that enables you to capture all the necessary data for the case task.
Examples of Forms for collecting information in your case:
Personal details
Financial information
Co-signer information
Loan request
Health information
See instructions for building a Form, in Create a Form.
.png)
Note
Collapsible sections in Forms are not supported for Case Manager.
Step 2: Create a new Workflow
Create a Workflow, see Create Workflows.
.png)
Step 3: Add a condition hub
For technical reasons, unlike a typical Workflow used in the Collaboration Room module, a Case Manager task Workflow requires a condition hub even for a simple Workflow with one step.
For additional information about adding a condition hub, see Add conditional Workflow elements..png)
Create the condition hub in the following way:
Add the condition hub to the Workflow.
Create a condition that will definitely be fulfilled in the case.
Tip
To create a condition that will definitely be fulfilled in the case:
Create a dedicated Attribute that will not be used in the case.
Set a condition statement that says the unused attribute does not equal 1.
Because this Attribute is always empty, the condition will always evaluate as true.
Step 4: Add the Form
Now it’s time to add the Form you created in Step 1 to the Workflow.
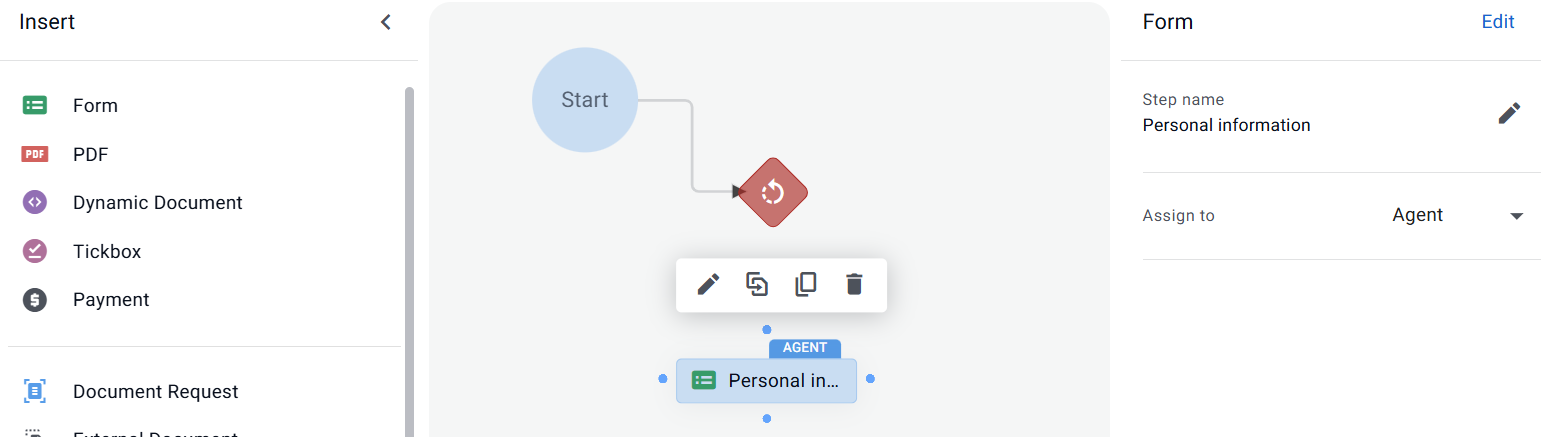
Please follow these rules:
You can add only one Form to a Workflow that will be used for a case task. If you require another Form to be included in the case, you’ll need to need to add it to a different Workflow for creating another task in the case.
Select the Form item that you added and, in the right panel, assign the Form to Agent.
.png)
Step 5: Connect the Workflow elements
Finally, connect all the Workflow elements as follows:
Start TO Condition hub
Condition hub Condition (1) connector TO the Form
Condition hub In all other cases connector TO End

After publishing the Workflow, you are finished. The Workflow is ready for including in a case.
Customer engagement Workflow
Use this Workflow type when you want to initiate customer-facing actions from a case task—such as sending a document, requesting a signature, and/or collecting information.
Unlike the other Workflow types in this article, the customer engagement Workflow does not require any specific Workflow elements. It is built the same way you would build a Workflow for a Collaboration Room session.
For more details on building Workflows, see the Workflow documentation.
Additional participants
Customer engagement Workflows in Case Manager can include multiple participants, allowing more than one person to take part in the same customer session.
This supports scenarios where documents require action from multiple parties, such as co-signers, joint applicants, or reviewers who must approve or complete specific steps within the Workflow. All participants are managed within the same task, keeping related customer activity consolidated under a single case.
For more information, see Create multi-signer Workflows.
Agent actions in the Workflow
You can add agent actions alongside customer-facing steps, just as you would in a Collaboration Room Workflow. Agent steps appear to the agent before the Workflow is sent to the customer, allowing them to complete required actions in advance.
Agent actions may include tasks such as providing contact details for additional participants, adding an agent signature to a document or completing a Form. These steps ensure that any agent-side prerequisites are handled before the customer receives the Workflow.
For more information, see Send a Workflow that requires agent input.
OTP authentication
Customer engagement Workflows support OTP (One-Time Passcode) authentication in two ways:
Session-entry OTP — if enabled in system settings, the customer must enter an OTP to access the collaboration UI for the task. No Workflow configuration is required. See Customer authentication.
OTP Workflow step — add an OTP step anywhere in the Workflow to require the customer to verify their identity at that point in the task. See Customer authentication as a Workflow step.
Document generation Workflow
Once information has been captured and organized in a case, you can use Case Manager to generate custom documents that incorporate customer data.
A document generation contains the following item only:
Dynamic Document
To build a data capture Workflow follow these steps:
Step 1: Build a Dynamic Document
Create a Dynamic Document that incorporates captured data that is bound to Attributes.
See instruction for building a Dynamic Document in Create Dynamic Documents.
See instructions for adding Attributes to a Dynamic Document in Add dynamic elements to a Dynamic Document.
.png)
Note
In the Customer can dropdown, select Download.
.png)
Step 2: Create a new Workflow
Create a Workflow, see Create Workflows.
.png)
Step 3: Add the Dynamic Document
Add the Dynamic Document that you created in Step 1 to the Workflow.
In the Assign to dropdown, select Agent.
.png)
The Send to customer setting appears.
Turn off the toggle.
.png)
Place an End item and connect the Dynamic Document to it.
Publish the Workflow.
.png)
You are finished. The Workflow is ready for including in a case.