When you send a Workflow that includes a Document Request step, you may be prompted to configure the step before it is sent to the customer. This happens when the business configurator has enabled agent input for that step.
The configuration dialog appears when you add the Workflow to the session. Depending on what the BC has enabled, you may be able to:
Choose which documents from the predefined list to request
Add custom document types not in the predefined list
Add or edit descriptions to help the customer understand what each document should be
Set the minimum number of documents the customer must upload
Exclude the step entirely if no documents are needed
If none of these options have been enabled for a step, no dialog appears — the step is sent to the customer exactly as configured in the Workflow.
Configuring a Document Request step
When you add a Workflow to a session, you may see all or some of the options below. Review and configure the step, then click Send to add the Workflow to the session.
1. Include or exclude the step
If the step can be excluded, a toggle appears next to the step name. By default the toggle is on, meaning the step will be included..png)
To exclude the step, turn the toggle off. The customer will not see the step and the Workflow will continue to the next step automatically.
.png)
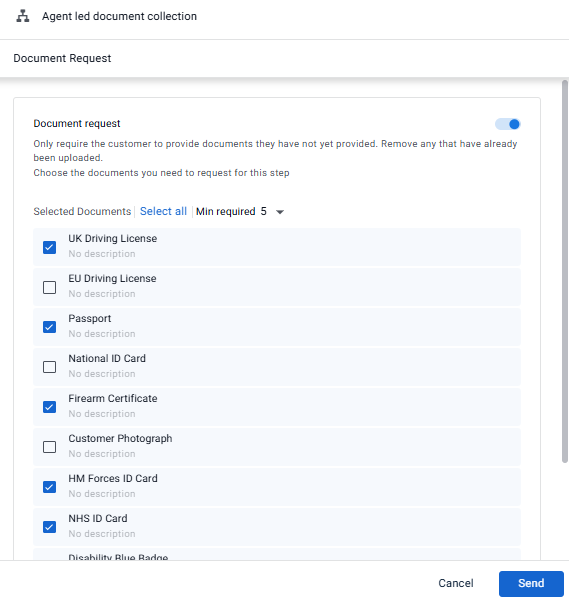
2. Select the documents to request
The list shows all documents configured for this step. Select the documents relevant to this customer and deselect any that are not needed.
If your BC has provided instructions for this step, they appear at the top of the card — read these before making your selections.
To select all documents at once, click Select all.
To clear all selections, click Deselect all.
Note
You must select at least one document.
.png)
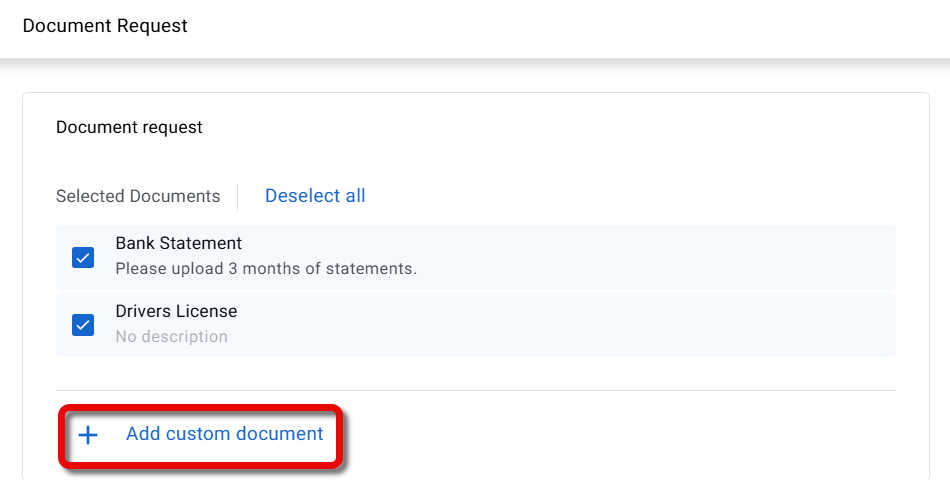
3. Add a custom request
If the BC has enabled custom documents for this step, you can add a document type that is not in the predefined list.
Scroll to the bottom of the document list and click Add custom document.
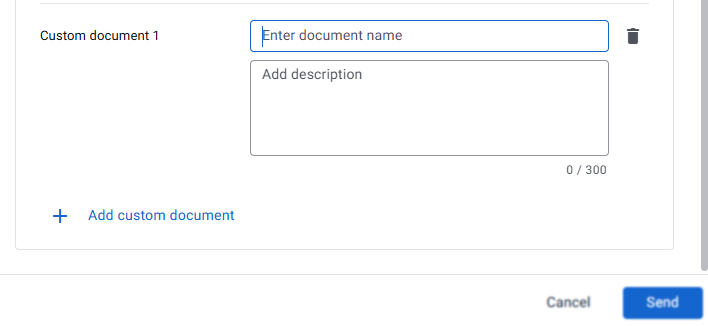
The Custom document 1 settings appear.Enter the document name and an optional description.
To add more documents click Add custom document.
Click Send to send the Workflow.
The custom document is added to the list and will be requested from the customer alongside the predefined documents.
4. Set the minimum number of required documents
The Min required dropdown controls how many documents the customer must upload before they can proceed. The default is set by the BC.
To require fewer documents, open the Min required dropdown and select a lower number.
To make the step optional, set Min required to 0. The message Documents are optional for this step confirms that the customer can proceed without uploading anything.
Note
The number of selected documents must be equal to or greater than the Min required value.
.png)
5. Add a description to a document (optional)
You can add a short description to any document to give the customer more context about what is required.
For example, if you are requesting a bank statement, you could add: Please upload the last 3 months of statements.
Hover over a document name and click the icon.
.png)
The Edit dialog appears.Enter the description and click Done.
.png)
The description appears under the document name in the list.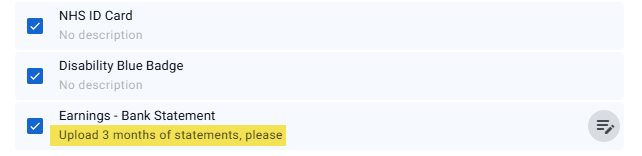
When you have finished configuring the step, click Send to add the Workflow to the session.