This article explains how to create Lightico Attributes that enable you to organize, store, and use customer data during a collaboration session.
To create basic Attributes:
In Admin Center page, go to Attribute mapping.
The Attribute mapping page opens, displaying the existing Attributes.
On the top right corner of the page, click Create new and select the type of Attribute that you want to create.

The Create Attribute dialog appears.
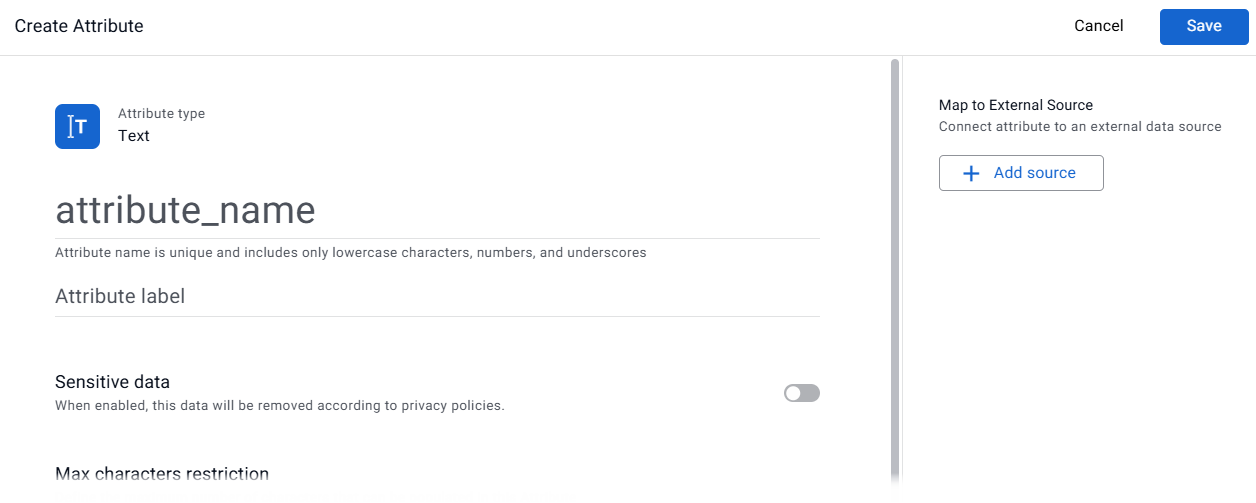
Complete the following fields:
attribute_name - The unique system name of the Attribute
Note
The name can include only lowercase letters, numbers, and underscores and is limited to 50 characters.
Attribute label - The default label that the customer sees when completing a Form. The label can be changed in the Form builder.
Sensitive data - Define this attribute as "sensitive". Fields containing sensitive Attribute data can be:
Max characters restriction - The maximum number of characters allowed for this field. (text, digit and date fields only)
Map to external source - Map fields from your app/platform to Lightico Attributes. For more information, see Custom integration hub for API and events.
See additional settings below, depending on the type of Attribute.
Click Save.
Attribute types and additional settings
The following is a list of all Attribute types and additional settings or links to more information according to the type of Attribute you are creating.
Address
Stores structured location information such as street, city, state, and postal code.
For more information, see Address Auto-Complete and Validation.
Boolean
Stores a true or false value that can be used in conditions. In a Form, it appears as a single checkbox with a label. When the customer selects the checkbox, the Attribute value is set to true; if it is not selected, the value remains false.
For example, if you want the customer to confirm that their spouse is included in an application, you could create a Boolean Attribute called “include_spouse” with the label “Include your spouse in the application.”
.png)
Checkbox
Allows users to select one or more options from a predefined list.
For more information, see Create dataset Attributes.
Complex
Groups multiple related sub-Attributes under a single Attribute for structured data collection.
For more information, see Create complex Attributes.
Date
Stores a calendar date value.
Provides a date picker UI when the customer fills in the Form.

Date Attribute field shown in the customer UI with date picker
Define the following optional setting for date Attributes:
Limited time range - Select one of the following options to limit the date that your customer can define (for date fields only):
None - unlimited
Absolute time range - specific start and end date
Relative to Attribute time range - start and end date relative to another date attribute
Relative time range - start and end date relative to the current date
Dropdown
Allows users to select a single option from a predefined list.
For more information, see Create dataset Attributes.
Function
Calculates a value dynamically based on other Attributes or system values.
List
Stores multiple values instead of a single value within a session.
It can also hold complex items, where each item in the list contains multiple related Attribute values (for example, account number, account type, opening date, and balance).
For more information, see Create list Attributes.
Number
Stores numeric values for calculations, comparisons, and numeric validation.
Define the following optional setting for number Attributes:
Formatting
Use the Formatting settings to control how values appear when a number Attribute is displayed. This affects only the visual format of the value, not the stored data.
These settings allow you to match the display format of numeric values to your business or regional requirements.
Note
The number of decimal places can only be defined in Form settings, not within the Attribute configuration itself.
In the Formatting section, open the Format type dropdown.
Select the type of number you want to display:
Number – Standard numeric display.
Percent – Appends a % symbol.
Currency – Displays the value with a currency symbol ($ £ €).
Configure the additional formatting options that appear based on the format type.
Number format
If you select Number, configure the Separator style to define how thousands and decimal values are displayed.
Options include:
No separator – Displays the number without thousand separators.
US / International – Uses a comma ( , ) as the thousand separator and a dot ( . ) for decimals (for example:
1,234.56).European – Uses a dot ( . ) as the thousand separator and a comma ( , ) for decimals (for example:
1.234,56).
Percent format
If you select Percent, the value is displayed with a % symbol after the number.
You can also choose the Separator style using the same options as the Number format.
Example: 75%
Currency format
If you select Currency, an additional Symbol dropdown appears.
Select the currency symbol:
USD ($)
GBP (£)
EUR (€)
Select the Separator style to define how the value is displayed.
Example: $1,234.56
Radio Button
Allows users to select a single option from a visible list of choices.
.png)
For more information, see Create dataset Attributes.
Signature
Stores a digital signature within a session.
Text
Stores free-text input such as names, notes, or identifiers.
Define the following optional setting for text Attributes:
Display text as number
Use this option for a text Attribute when you need to collect a numeric identifier that may include leading zeros.
Unlike a number Attribute, which removes leading zeros, this setting allows a text Attribute to accept digits (0-9) only while preserving the exact value entered, including any leading zeros.
This is useful for identifiers such as account numbers, policy numbers, or ID numbers.
To enable this option:
Select the Display text as number checkbox.
Validation
You can enable validation for a text Attribute to ensure that users enter values in a specific format. Validation helps prevent incorrect or incomplete data from being submitted.
To enable validation:
Turn on the Validation toggle and select the type of validation you want to apply.
Available validation types include:
Email – Ensures the value is entered in a valid email format and includes an @ symbol and a supported domain ending.
IBAN – Ensures the value is a valid International Bank Account Number.
BIC – Ensures the value contains 8–11 characters, as required for a Bank Identifier Code.
Israeli ID – Ensures the value matches the format of a valid Israeli ID number.
Once validation is enabled, the system checks the entered value and prevents submission if the format is invalid.