During a Lightico session, you can request supporting documents from a customer—such as ID cards, bank statements, or utility bills. When the customer opens a Document Request interaction, they can either upload a file or, if on a mobile device, take a photo of the document directly.
Document Requests can be added as steps in a Workflow or used as stand-alone interactions via the agent console or API. When used in a Workflow, Lightico can also authenticate documents and extract key data automatically.
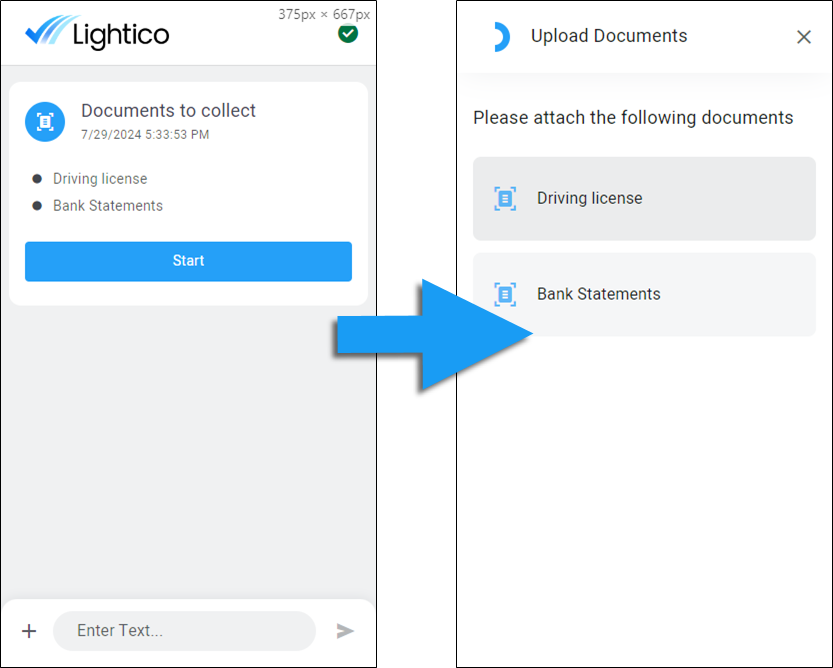
Document Request shown in the customer UI
Document Request categories
Every Document Request in Lightico must belong to a category. Categories help organize and visually distinguish the types of Document Requests that you create in the following areas:
Document Requests page - Click a category in the Categories pane to filter the Document Request list by category.
Workflow builder - When you add documents to a Document Request step, you can filter the documents by category.
Create new categories
Categories can be created in the Admin Center and may include examples like “Personal ID” and “Financial”.
To create a Document Request category:
In Admin Center, go to Document Requests.
In the Categories pane on the left, click New category.
.png)
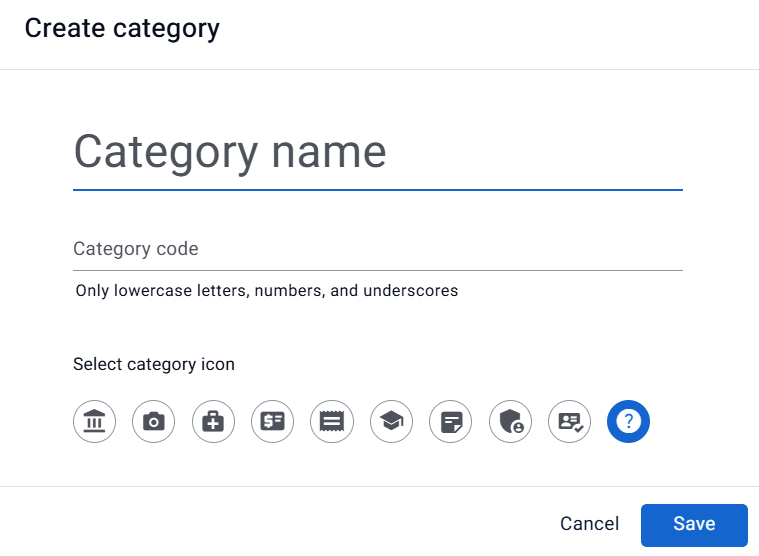
The Create category dialog opens.In the Category name field, enter a name for the category.
In the Category code field, enter a string of lower-case letters and underscores (optional), without white spaces.
Select an Icon to associate with this category.
Click Save.
Edit a category
To edit a category:
Hover over the category and click the edit icon.
Note
You cannot edit the category code.
Delete a category
To delete a category:
Hover over the category and click the delete icon.
Note
A category that contains documents cannot be deleted.
Copy a category code
You may need to copy the category code for inclusion in an API endpoint.
To copy a category code:
Hover over the category and click the copy icon.
Document Request types
A document type defines the specific document a customer is required to provide—such as a driver’s license, passport, or bank statement. Each type is grouped under a category (see above) to keep your document requests organized and easy to manage.
Add document types
To add a document type:
In the Document Requests page, click New document in the top right corner.
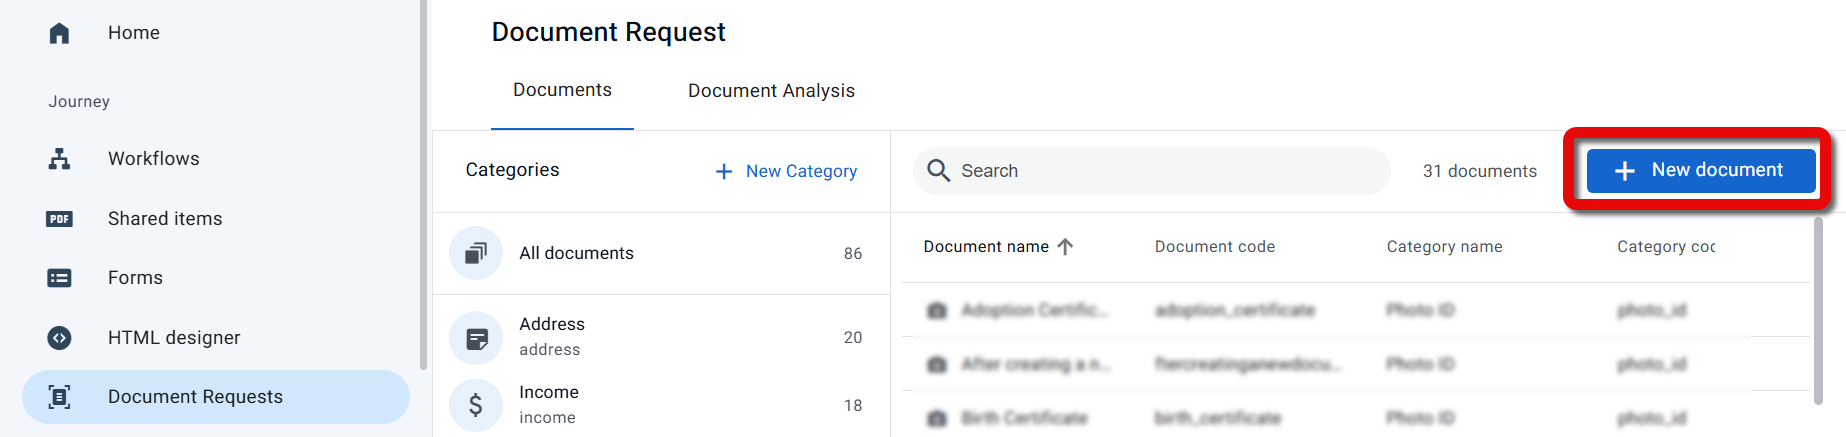
The Create document dialog opens.In the Document name field, enter a name that describes the document.
This is the name that will appear for the customer in the session.Tip
When you add a Document Request step to a Workflow, you can add a description to each document. See Add Document Requests to a Workflow.
In the Document code field, enter a string of lower-case letters and underscores (optional), without white spaces.
From the Category dropdown, select a category to associate with the document.
Set the Page limits for pages or images that the customer can upload for this document. See below.
To use Advanced processing for uploaded document, select a document type and configure the settings. See below.
Click Save.
.png)
Set page limits
You can define the minimum and maximum number of pages that a customer must upload for a Document Request. A “page” can refer to a traditional document page (for example, a page of text in a PDF) or a single image. Multi-page files are counted per page—for example, a 3-page PDF is treated as three pages, not one file.
When page limits are set, customers cannot complete the task until the number of uploaded pages falls within the required range. This helps ensure documents are submitted in the correct format and reduces incomplete or incorrect uploads.
.png)
Document Request interaction on customer mobile device
Note
Page limits can be defined for Photo ID documents only when extraction is off; when extraction is on, customers are always required to upload exactly one image.
To set page limits for a Document Request type:
On the right side of the Create or Edit document dialog, under Page limits, select the minimum and maximum number of pages.
Edit the document name
Double-click the document in the list, in the Edit document dialog - edit the name, and click Save.
Delete the document
Hover over the document in the list, click the options menu and select Delete.
Advanced processing
When creating a Document Request, you can enable advanced processing to apply additional validation, authentication, and automation to documents.
Advanced processing is supported for any document type that has a processing model, including custom-trained models and third-party integrations such as Mitek.
Contact your Customer Success representative to enable and configure a custom-trained processing model.
Capabilities
Advanced processing includes the following capabilities. Availability depends on the selected processing model and how the document is used in a Workflow.
Classification validation
Verifies that the uploaded document matches the expected document type (for example, confirming that the file is a driver’s license and not a different form of ID or document).
Classification validation focuses on what the document is, based on its visual structure and characteristics and the pass/fail result can then be used to decide the path of your customer in a Workflow.
Additional checks
After the classification is validated, checks for document integrity indicators.
Data extraction
Extracts structured data from the document —such as name, date of birth, and address—and allows you to bind that data to specific Attributes for use in the collaboration session or Workflow logic.
Photo ID authentication
Validates the authenticity of a supported photo ID by analyzing whether the document appears to be genuine and unaltered, rather than on identifying the document type. This includes checks for indicators of tampering, manipulation, or inconsistencies that suggest the document may not be legitimate.
Authentication can also support identity verification by enabling comparison between the photo ID image and a live selfie when configured in the Photo IDV step in a Workflow.
AAMVA check
For supported US driver’s licenses, checks the document against AAMVA-registered information to add an additional layer of validation.
How this works in practice
Advanced processing settings enable capabilities at the Document Request level, while the specific features applied depend on how the document is used in the Workflow.
Document Request Workflow step - supports classification validation and data extraction, verifying that the uploaded document matches the expected license type and extracting key data fields for use later in the flow. See Add Document Requests to a Workflow.
Photo ID Verification (Photo IDV) step - supports authentication and you can optionally enable a selfie capture to perform customer identity verification by comparing the selfie to the photo on the ID. See Customer verification as a Workflow step.
Configure advanced processing
Follow the directions for adding a document type above.
Turn on the Advanced processing toggle.
The Select document type dialog appears.On the left side, select the processing model and then, on the right side, the document type.
Click Save.
.png)
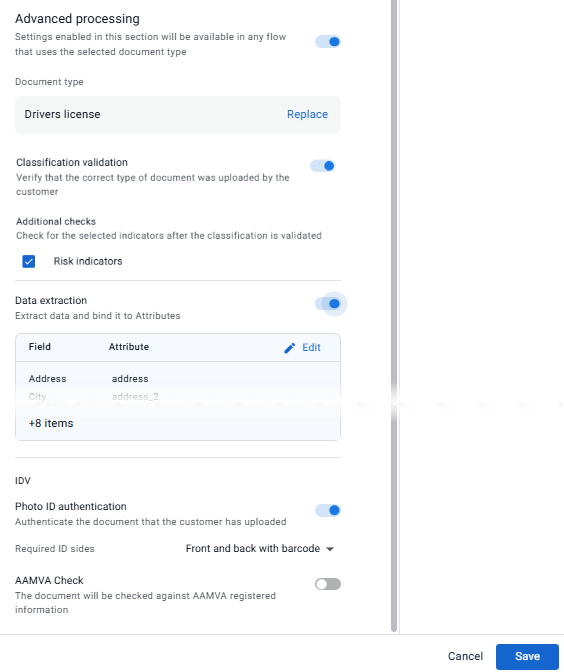
Enable and configure any of the following optional settings:
Enable Classification validation.
When classification validation is enabled, select any Additional checks to perform.
Enable Photo ID authentication and select what sides of the ID are required.
Note
If you select back with barcode, the capture will fail if a barcode is not detected on the back of the ID.
Enable AAMVA check.
Enable Data extraction and map extracted data categories to Attributes.
These Attributes can be used in the context of a Workflow to populate data that was extracted from the document in a subsequent step, such as a conditional element or Form.
At the bottom of the dialog, click Save.
AADMV verification
You can add an additional layer of authentication for US driver's licenses by having the license checked against AAMVA registered information.
To activate this feature, please speak to your Customer Success representative.
To create a Document Request for a US driver's licenses with AAMVA verification:
In the Create document dialog, turn on the AAMVA Check toggle.
Q and A
What if my customers will be scanning photo IDs or driver’s licenses with no barcode on the back side?
When you create the Photo ID Document Request, select Front and back without barcode. If you choose Front and back with barcode, the system will only verify the back of the ID when a barcode is detected. Using the correct option ensures the customer can submit both sides even when the document has no barcode.
Can customers upload multi-page PDFs instead of individual images? How does Lightico count them?
Yes. Customers can upload multi-page PDF files, and Lightico will treat each page of the file as a separate page/image. For example, a 3-page PDF counts as three pages, not one file. If you set page limits, make sure they reflect the total number of pages expected—not just the number of files.
What happens if a customer tries to upload more or fewer pages than allowed?
The customer cannot complete the Document Request until the number of uploaded pages is within the required range. The UI prompts them to add or remove pages/images as needed. This ensures you receive complete, correctly formatted submissions—reducing follow-up requests and manual correction.