Lightico provides a number of methods to authenticate a customer identity before entering a session. This article explains the different methods and how to configure them.
All authentication methods for entering a session apply to the primary participant as well as cosigners.
Note
These settings can also be configured according to team. Team settings override System settings. For more information, see Define unique team settings.
Activate customer authentication
By default, a customer receives a session invitation link and can enter the session without authenticating their identity.
To activate customer authentication:
In the Admin Center, under Settings, go to System or Teams > Settings.
In Customer authentication settings, under Activate customer authentication turn on the Require customer… toggle.
Under First entry to session, select one of the following customer authentication methods:
OTP - A one-time password is randomly generated. See below.
Session PIN - A PIN is defined by the agent before starting the call. See below.
KBA - Knowledge Base Authentication is validated based on answers to specific questions. (Requires a third-party integration, contact support for more information.)
Photo ID - Validates the government issued ID, but not the customer. (Requires Mitek integration.)
Photo ID + Selfie - A selfie photo is compared to a valid government issued ID picture. (Requires Mitek integration.)
Subsequent entries to session
To require customers to authenticate on every entry to the session:
Turn on the Subsequent entries to session toggle.
Select an authentication method from the dropdown.
Under Require authentication after the customer has been offline for, set the amount of time that the customer is offline to require a new authentication.
Configure customer lockout settings
The following settings define how you handle failed authentication attempts. These settings can be configured for both OTP and session PIN authentication.
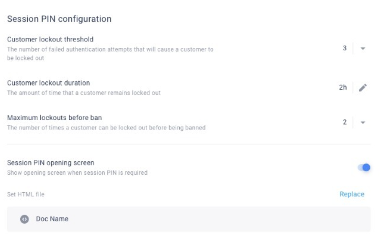
Customer lockout threshold
Set the number of failed authentication attempts that will cause a customer to be locked out.
Customer lockout duration
Set the duration that a customer remains locked out.
Maximum lockouts before ban
Set the number of times a customer can be locked out before being banned.
OTP authentication
This authentication method requires all session participants to enter an automatically generated one-time password (OTP) to enter the session.
You can reveal the OTP to the customer in one of the following ways:
Agent - The agent is shown the OTP in the agent console and can say it over the phone.
Notification - The customer receives an SMS or email with the OTP.
This section explains settings that are unique to OTP authentication, to configure the lockout settings, see Configure customer lockout settings above.
OTP SMS content
Enter the content of the notification that customers will receive with their one-time password. Use the string #PIN# to insert the OTP into the message. For example:
Enter #PIN# to be admitted into the collaboration session.
OTP expiration
To set a time limit for how long the OTP is valid, turn on this toggle and set the period of time.
Show OTP to Agents
If the agent will be guiding the customer into the session, turn on this toggle to display the OTP in the agent console.
For the agent perspective of this setting, see Providing the OTP directly.
Send OTP to customer
To automatically send the OTP to the customer when they open the session link, turn on this toggle.
When this setting is enabled, the agent is required to enter 2 communication channels - a phone number and an email address. The session invitation is sent to one and the OTP is sent to the other.
For the agent perspective of this setting, see Sending an OTP automatically.
Session access PIN authentication
This authentication method requires the agent to define an access PIN before starting the session with the customer. The PIN must be 4 to 20 numbers (no letters or special characters), for example, an ID/Social Security number, last digits of payment method, or some other number agreed upon between the agent and the customer.
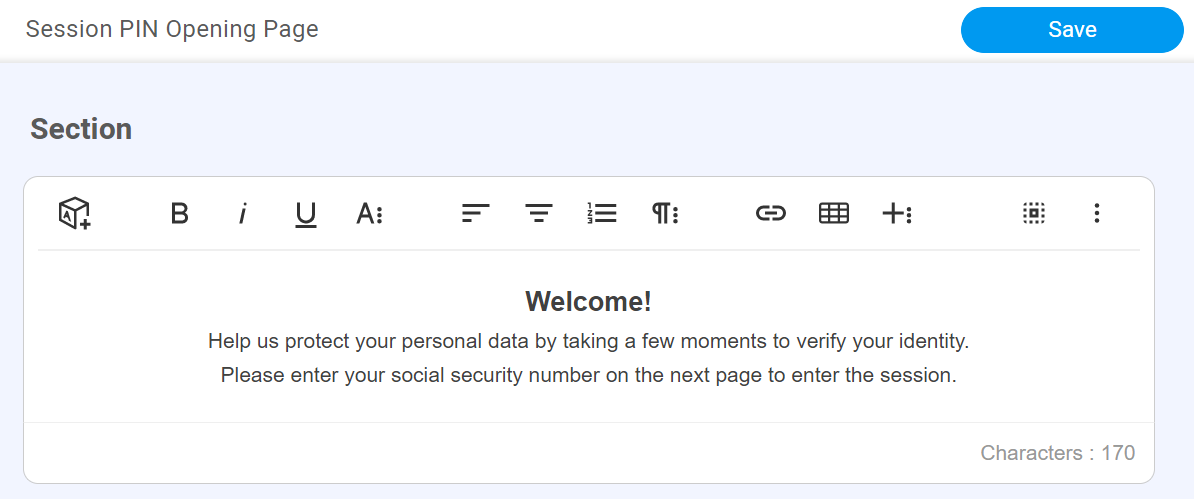
Customize the session access PIN opening screen
The customizable opening screen for this type of authentication provides a hint to what number the customer should enter. The customer must enter the PIN to authenticate his identity and start the session.
The instructions below explain how to customize the opening screen. To configure the lockout settings, see Configure customer lockout settings above.
For an explanation of the agent side of this feature, see Define a session access PIN.
To customize the opening screen for session access PIN authentication:
Go to the Workflow > HTML Designer page and create a static HTML page for the opening page (see Create static documents).
Go to System settings > Customer authentication, Session PIN configuration section.
Turn on the Session PIN opening screen switch.
Search for the HTML document in the Doc Name field and click Set HTML file.
After clicking Save Changes at the top of the settings page, the opening screen is created.
Configure photo ID authentication settings
Define how many attempts customers have to complete Photo ID verification and how lockouts are handled.
Lockout thresholds
Control how many attempts a customer has at each stage of the verification process.
Lockout threshold – Image quality and document type
Set the number of attempts a customer has to upload a clear image of the correct document type before being locked out.Lockout threshold – Authentication
Set the number of attempts a customer has to complete authentication (verfying that the document is genuine and not tampered with) after the document image and type are accepted.
Lockout limits
Define how repeated lockouts are handled.
Maximum lockouts before ban
Set the number of times a customer can be locked out before being blocked from further attempts.
Lockout duration
Define how long a customer remains locked out.
Lockout duration
Set the duration that a customer must wait before attempting verification again after being locked out.
How these settings work together
Photo ID verification is enforced in stages:
The customer must first submit a valid document image and correct document type.
Once accepted, the customer proceeds to authentication.
If the customer exceeds the allowed number of attempts at either stage, they are locked out.
After repeated lockouts, the customer can be banned from further attempts.
These controls help prevent repeated failed attempts while allowing flexibility to support legitimate users.
Q and A
Can I require different authentication methods for different teams?
Yes, team-level settings override system-level settings, allowing tailored authentication per team.
What happens if a customer is locked out multiple times?
You can configure a ban after a set number of lockouts using the “Maximum lockouts before ban” setting.
Can I send the OTP automatically and still allow the agent to view it?
Yes, both “Send OTP to customer” and “Show OTP to agents” can be enabled simultaneously.
Is it possible to use both email and SMS for sending the OTP?
Yes, but only one channel is used for the session invite and the other for the OTP. For example, if the invite is sent via SMS, the OTP is sent via email, and vice versa.
Can I customize the hint shown on the Session PIN entry screen?
Yes, by creating a static HTML page and linking it in the Session PIN configuration. See above.