Create Forms
  • 10 Mar 2024
  • 13 Minutes to read
  • Dark
    Light
  • PDF

Create Forms

  • Dark
    Light
  • PDF

Article Summary

This article describes how to create and design Forms using the Form designer. Forms are used to capture information from the customer or agent during a Workflow.

A Form as it appears on a customer device

Create a new Form

To create a new Form:

  1. In the Lightico Administration page, in the navigation pane under Journey, click Forms.
    The Forms page open, showing all saved Forms. 

  2. Click Create in the top right corner. The Create New Form dialog appears.

  3. Enter a name for the Form and click Create.

    The Form designer opens.

  4. Add Attribute fields to the Form as described below.

  5. Design and format the Form as described below.

  6. Click Save.

Add Attribute fields to the Form

You can add the following types of fields to a Form:

  • Text - Enter free text

  • Number - Enter a number

  • Checkbox - Select one or more options

  • Dropdown - Select one option from a dropdown list

  • Radio button - Select one of the button options

  • Boolean - Select true or false

  • Date - Select a date from a calendar

  • Address - Enter an address (only available when you are integrated with an address verification service, see Address Auto-Complete and Validation)

  • Complex - Groups multiple Attributes under one parent Attribute, acting as a label for the grouped Attributes in the Form. Enhances organization and clarity in data entry.

    Note:

    Currently complex Attributes can only be created and edited in the Form designer. They are available for use in Forms and in PDF Templates.
    They cannot be created or edited in the Attribute mapping page.

Every field in a Form needs to be bound to an Attribute. When building a Form, you can either link to existing Attributes (see Create basic Attributes) or create Attributes as you add fields to the Form. 

To add Attribute fields to a Form:

  1. Click the + button in the relevant section and select Attribute.
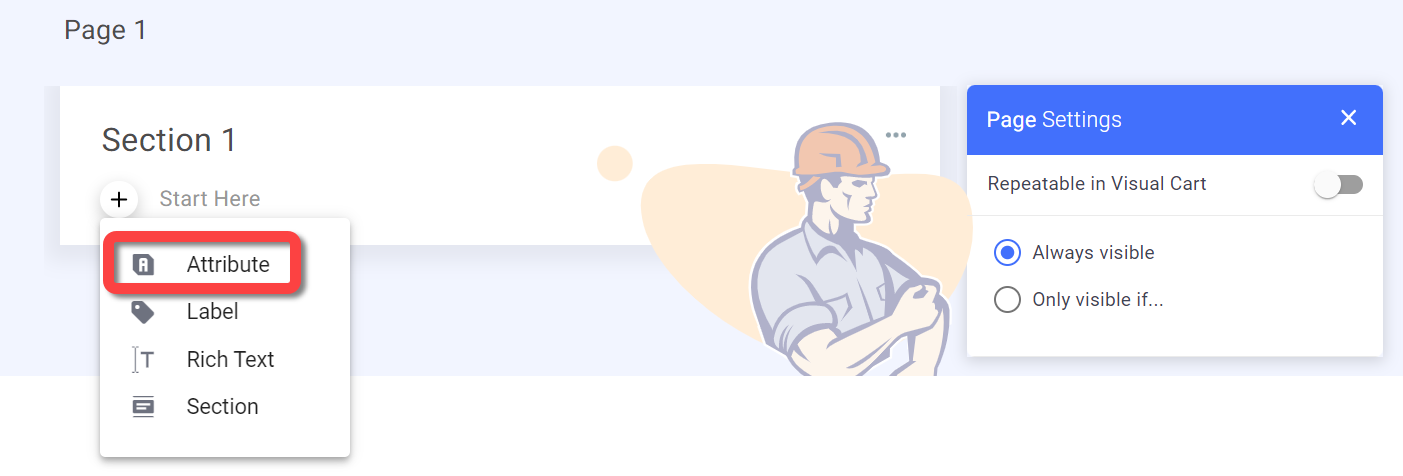
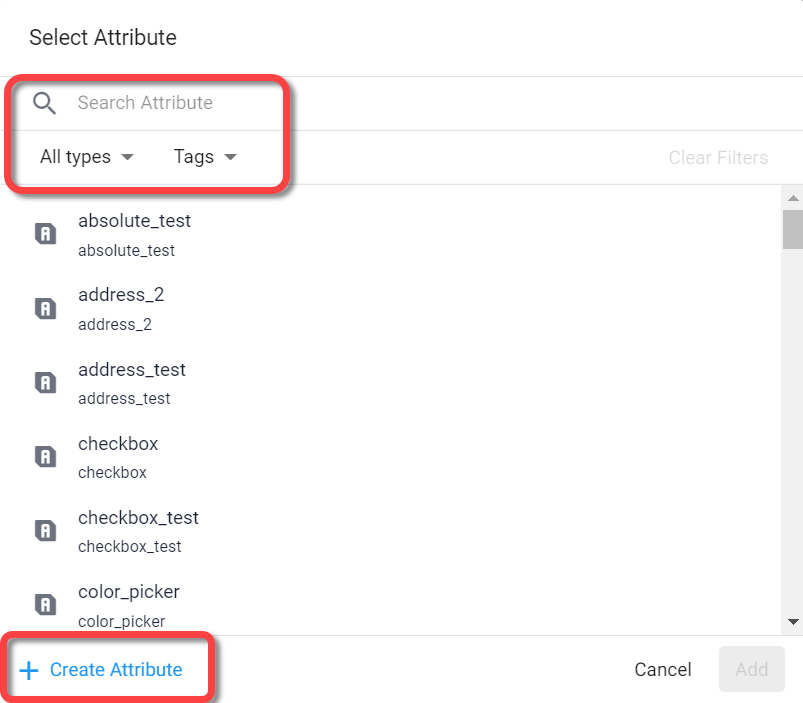

    The Select Attribute dialog appears.

  2. Search an existing Attribute or create a new one (see below), then click Add.

    The field is added to the Form.

  3. Configure the field settings.

    When you select a field, the settings for that field are displayed in the settings pane on the right.
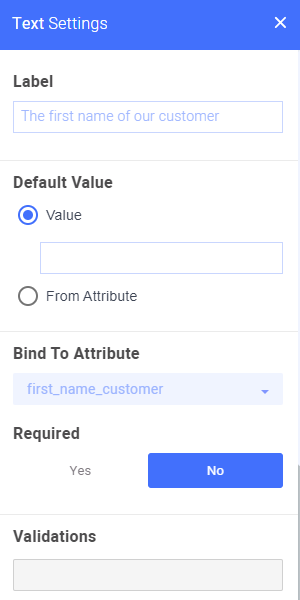
    See Field settings for a description of each of the field settings and how to configure them.

  4. Click Save to update the Form.

Note:

Each checkbox and radio button option contains a sub-section, which allows you to nest a field inside one of those options. For example, If you have a checkbox with a few options, you can nest a text field under one of the options. The field will only be displayed if the customer chooses the relevant checkbox option. To nest a field, click the + button under the relevant checkbox or radio button option and add the desired field.

Create a new Attribute in the Form designer

When you add a field to the Form, you can either select an existing Attribute, or choose to create a new Attribute. 

To create a new Attribute in the Form designer:

  1. Click the + button to add an Attribute field to the Form.
    The Select Attribute window appears (see above).

  2. Click Create Attribute.

    The Create Attribute dialog appears.

  3. Configure settings using the following general guidelines:

    Note:

    Not all settings apply to all types of Attributes.

    • Attribute name - Unique system name to identify the Attribute in the system. Only lower case letters and underscores are allowed.

    • Attribute label - A description of the Attribute. This text appears in the field before it is filled in.

    • Max characters restriction (for text and number only)- Maximum number of characters that can be entered into this field by the customer.

    • Add options (for checkbox, dropdown, radio button only) - To define the options for multiple selection Attributes, do one of the following:

      •  Select Link to a dataset and select a dataset file. (To create and upload a dataset file, see the first two sections of Create dataset Attributes.)

      • Select Insert manually and enter the options from which you want the customer to select. Each option must have an ID (number or character to identify each option) and a Name. For example, if the values are red, yellow and blue, enter them as follows:

    • Limited time range (for date only) - Turn on this toggle to set either a relative or absolute time range.

    • Mandatory and Optional properties (for address only) - see Address Auto-Complete and Validation.

Note:

To map Attributes created in the Form Designer to relevant fields in your integrated platform, see Map Salesforce data to Lightico.

The next section explains additional settings that can be configured for fields after they have been added to the Form.

Edit an existing Attribute in the Form designer

If you choose to create a field with an existing Attribute, you may need to edit it before including it in the Form. 

Note:

When you edit an Attribute in the Form designer, the change will be reflected system-wide for all future use. However, if the Attribute is already being utilized in a different Form, you will need to access that Form and make the required modifications there.

To edit an existing Attribute in the Form designer: 

  1. Click the + button to add an Attribute field to the Form.
    The Select Attribute window appears.

  2. Hover over the Attribute to reveal the edit icon.

  3. Click the edit icon.

    The Edit Attribute window opens.

  4. Edit the Attribute and click Save.

    The Attribute is edited.

Field settings

After you've added an Attribute field to a Form, you can select the field and configure settings for the field in the right pane of the Form designer.  

See the beginning of each section below for information about to which field types the setting applies.

Label

Applies to all fields.

The title that appears above the field in the session.

Form as shown in the customer UI

 Default Value/State

Applies to all fields.

  • For text and number fields, you can select a default value for a field in 2 ways:

    • Enter a default value by selecting Value and entering the value in the box.

    • Define another Attribute as the default value by selecting From Attribute and entering the relevant Attribute.

  • For date fields, select the default date that will be selected in the Form.

  • For checkbox, dropdown, and radio button fields, select the value(s) that you want to be selected by default in the Form.

  • For Boolean fields, select whether True or False will appear as the default.

Bind to Attribute

Applies to all fields.

All Form fields are bound to an Attribute. You can change the Attribute to which a field is bound.

Required

Applies to all fields.

Define whether or not the field is required. You can also set a condition under which the field is required.

To define a field as required: 

  1. Under Required, select Yes.

    The condition settings appear.

  2. If you'd like to set a condition under which the field will be required, select Condition.
    The condition window appears.

    Enter the condition statement by selecting an Attribute, a comparison operator (for example, Contains) and the value you want to compare it against. For example, you can set a condition that the Attribute state_address should contain the value California.

  3. Click Save.

Validations

Applies to text fields only.

This property is read-only and indicates whether there are any input validations on the text field. You edit this property in the Attribute itself in the Attributes mapping page.

Min characters required

Applies to text and number fields only.

The minimum number of characters that the customer needs to enter.

Max characters allowed

Applies to text and number fields only.

The maximum number of characters that the customer is allowed to enter. 

This property is read-only. You edit this property in the Attribute itself in the Attributes mapping page.

Format

Applies to number and date fields only.

For number format, you can select how many decimal places to display.

For date format, you can select the format for displaying the date in the Form.

Width

Applies to all fields.

The percentage of the line that this field occupies. Used when there are two fields in one row of the Form. 

To change the width of a field, click and drag the Width slider.

Note:

Radio buttons and checkboxes cannot share a row with another field. For those field types, the width setting is read-only.

Selected checkboxes

Applies to checkboxes only.

Choose a minimum and maximum number of options that the user can select in the Form. If the user selects out of that range they will get a message that shows the number of options they need to select.

Sort

Applies to checkbox, dropdown, and radio button fields only.

Arrange the options in the customer Form in ascending or descending order. The sorting is based on one of the associated properties of the Attribute.

To sort the options in a dataset field:

  1.  In the Settings panel, select an associated property for the Attribute. 

  2. Click the the arrow to define ascending or descending order.

Send to Agent

Applies to dropdown, and radio button fields only.

Configure a field in a Form so that after the customer selects an option, the value of this field will be displayed in the agent interaction bubble after the Form is completed. Use this feature when agents are required to transfer certain pieces of data from the session into your CRM.

Field values displayed in agent UI after Form completed

 To send a field value to the agent:

  1. In the Dropdown Settings panel, turn on the Send to Agent toggle.

  2. Under Property, select the associated property of the bound Attribute that you want to show.

  3. Under Property label, change the text that appears before the property value in the interaction bubble.
     

Restrictions

Applies to date fields only.

A read-only fields that shows if a limited time range was defined for this number Attribute (see Create basic Attributes).

Filters for dropdown fields

There are two types of filters for limiting the dropdown options that the customer sees in the Form:

Local filter

Applies to dropdown fields only.

Apply a filter to a dropdown field that limits the options that the customer sees in the Form. The instructions below illustrate how to show only items with a certain price.

To apply a filter to a dropdown field:

  1. In the Dropdown Settings panel under Filters, select one of the associated properties (in the example, price).

    A list of all possible values for the selected property appears.

  2. Select the values that you want to appear in the Form (in the example, 200 and 100).

    In our example, only items with a price of 200 or 100 will be shown to the customer in the dropdown.

Cascade filter

Applies to dropdown fields only.

Create a filter for a dropdown field based on the input from a different dropdown in the Form. For example, when the customer selects a phone, he is only shown phone covers that fit that phone. To create this filter, the two dropdowns must have an associated property in common. In our example, both the phone model dataset and cover model dataset include an associated property called called size

When the customer selects a small size phone from the first dropdown, the second dropdown will only show covers that are listed as small size.

To create a cascade filter:

  1. Select the dropdown field that you want to filter. (in the example, phone_covers)

  2. Under Cascade by, from the first list, select the dropdown dataset on which to base the filter. (in the example, phones_with_size)

  3. From the second list, select the shared property by which you want to filter. (in the example, size)

Design the Form

This section describes how to work with the different design elements of the Form.

Pages

Using the page toolbar at the top of the page, you can add new pages to a Form and set conditions to determine if and when the page will be visible to the user.

Add a new page

To add a new page, click the + button in the page toolbar.

To scroll between the pages, use the dropdown list or the arrows.

To rename the page, click on the current page name, and edit the name.

Show or hide pages based on conditions

You can set visibility conditions to determine when the page will be visible to the customer based on certain conditions. For example, you can set a page to be visible only to people who live in California (based on the value they entered for State).

To set visibility on a page:

  1. Click the settings button. The page settings pane opens:

  2. Click Only visible if, and in the dialog box that opens, set the visibility conditions based on the relevant Attributes.

    You can combine multiple condition statements using And / Or logical operators. You can also create more complex conditions by including some condition statements in parentheses. For more information about working with conditions, see Setting conditions in Workflows.

Make a page repeatable

You can allow customers to fill out a page in your Form twice, by making the page repeatable. You can set a condition to make the page repeatable based on the value of an Attribute.

To make a page repeatable:

  1. Click the settings button to open the page settings and click the Repeatable toggle.

  2. In the Repeat By Attribute box, enter the Attribute that you want to base your condition on.

  3. Enter the condition for when the page will be repeatable.

  4. Click Save.

Sections

You can organize a page on your Form into different sections. Each section has a title and can be hidden or shown according to conditions that you define (see below). 

Note:

The following section settings have no affect on the customer UI:

  • Division of the Form into sections - to divide a Form into separate sections for the customer, see Pages.

  • Section names - to create a viewable name for the section, see Label.

To add a section to the Form:

  1. Click the + button and select Section.

     
    A new section is added.

  2. To rename the section, select the current section name, and edit it.

Section visibility

You can set visibility conditions on a section to determine when the section will be visible to the customer based on certain conditions. For example, you can set a section to be visible only to people above the age of 18 (based on the value they entered for Age).

To set section visibility:

  1. Click the section so that the Section Settings appear in the Settings pane:

  2. Click Only visible if, and in the dialog box that opens, set the visibility conditions based on the relevant Attributes.

    You can combine multiple condition statements using And / Or logical operators. You can also create more complex conditions by including some condition statements in parentheses. For more information about working with conditions, see Setting conditions in Workflows.

Make a section duplicatable

When you create a visual cart, you can set a section to be duplicatable. This means that the agent can re-use the section of the Form multiple times in the the same journey. For more information, see Create a visual cart.

Labels

Labels are lines of text that can be used as titles and can add more organization and clarity to the Form. Unlike rich text elements, labels can be placed side-by-side with other Form fields. However, label text cannot be formatted.

To add a label:

  1. Click the + button and select Label.

    A new label is added and the Label settings pane opens on the right.

  2. You can enter the name of the label or base the label value on an Attribute.

    • To enter the value of the label, select Value and type the name of the label

    • To base the label value on an Attribute, select From Attribute and select the relevant Attribute

  3. Select the font size from the Font size list.

  4. If you drag this field next to another field in your Form, you can define the relative width in the Width list.

Rich text

Enhance the design and readability of your Form by adding a section of formatted text. You can enter static text or an Attribute that will update in the Form as soon as the Attribute value is provided in the session.

To add formatted text to your Form:

  1. Click the + button and select Rich Text.

     The text editor appears.

  2. Enter and format your text.

  3. To insert an Attribute, place the cursor and click the Attribute button

    -OR-
    type @.
    The Attribute picker appears.

  4. Select the required Attribute.
    The Attribute appears.

  5. Select the Attribute to format it.

Layout

You can arrange the different elements in the Form by dragging them to the relevant location in the Form.

Most elements can be arranged side by side in the same row, except for dropdown fields, checkbox fields and formatted text. You can place up to a maximum of 3 elements per row.

In the element settings you can set the relative width of each element in the Width box.


Was this article helpful?