This article explains settings that can help give your Lightico session a personalized look and feel.
Note
These settings can also be configured according to team. Team settings override System settings. For more information, see Define unique team settings.
Customize session design
For Lightico sessions, you can upload your own logo and choose colors to match your brand instead of using the default logo and colors of Lightico. When the customer enters the session, they will see the customized design as in the following example:

Change the Logo
To change the logo:
Go to System settings ⇾ Format and design ⇾ Logo for customer session and click Replace File.
Note:
The image can be in PNG or JPEG format and can be a maximum of 500 KB.
The actual size of the logo in the UI is 236 x 56 pixels.
The file is uploaded and displayed at the top of the customer interface.
Customize colors
Below is an illustration of where each color set shows up in the customer UI.

To customize the colors:
Go to System settings > Format and design > Colors for customer session and turn on the toggle.
Click the edit icon.

The Choose colors pop-up appears.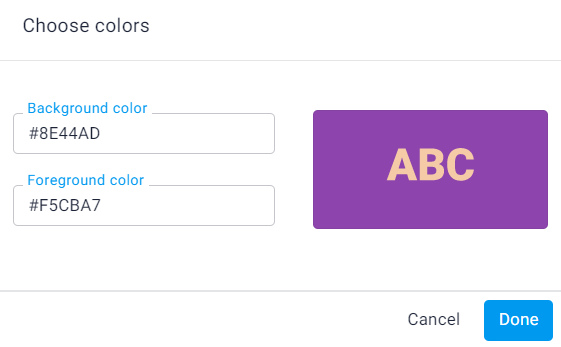
Click inside the Background color field to reveal the color picker and select the background color for interface elements.
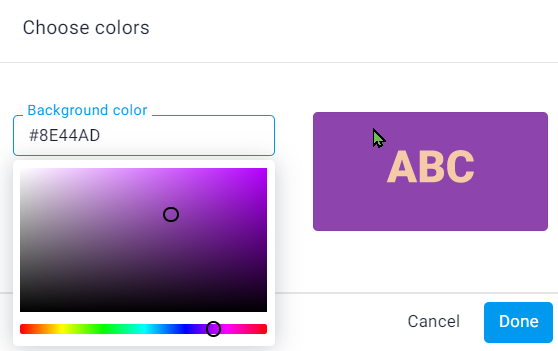
Click inside the Foreground color field to and select the font color.
Click Done.
The new colors are saved and will appear on the customer interface.
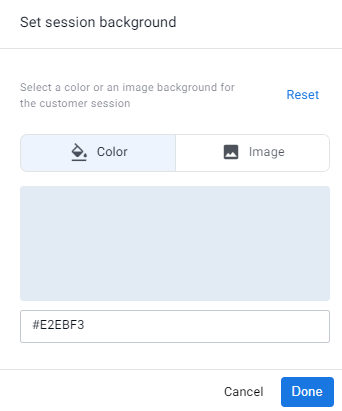
Define a session background
You can define a color or image to appear in the background of the customer session UI when they open the session on a desktop or laptop screen.

To define a session background:
Go to System settings > Format and design > Background for customer session and turn on the toggle.
Click the edit icon.
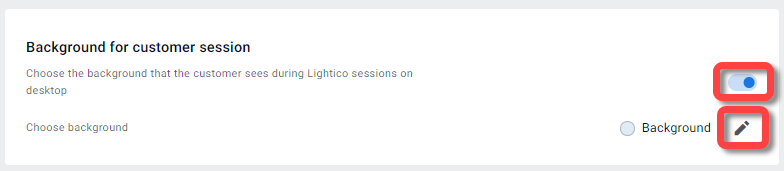
The Set session background window appears.Enter an HTML color code
-OR-
click Image to use the default image or upload your own.Click Done.
Customize corner radius style
You can customize the corner radius of buttons, panels, and input fields in the Collaboration Room agent and customer UIs. The corner radius controls how rounded or sharp each element appears—ranging from square corners to fully rounded edges. These settings can be used to match the look and feel of your company’s brand.
To customize corner radius style:
In system/team settings, under Format and Design > Corner radius style, turn on the toggle.
Edit the corner styles of each of the types or UI elements.
.png)
View the UI element preview to see the changes..png)
When you are finished editing, click Done.
Define default document formats
When an agent and/or customer completes document fields in a session, the data is placed inside the finished document. In System Settings, you can globally define default signature, font and date formats that dictate how the information will appear in all documents.
Note:
You can override the global formatting for a document when you create it in the PDF Template Builder. For more information, see Create PDF Templates.
.png "image(145).png")
To define default document formats:
Go to System settings ⇾ Format and design and configure the following settings:
Settings | Configuration instructions |
|---|---|
Signature color | Define the color of the signature that appears in completed documents. |
Document font size | Select the default font size for custom fields in PDF documents. |
Document font | Select the default font for custom fields in PDF documents. |
Document date format | Select the default format for the Date field and the Signature date field in PDF documents. This format also affects the way the date is displayed in the document audit trail. |
Include time in Signature date | You can choose to include the time in the Signature date field and you can select the time format. |
Customize UI text for completing a PDF template (wording templates)
You can create templates that change the default wording of button labels and messages that appear in the customer UI when completing a PDF form. Wording templates apply to PDF Templates and External Documents with an overlay template.
Note
Wording templates are supported only when the Format and design > Language setting is defined as English.
For example, you can change the label on the Approve button to read I approve.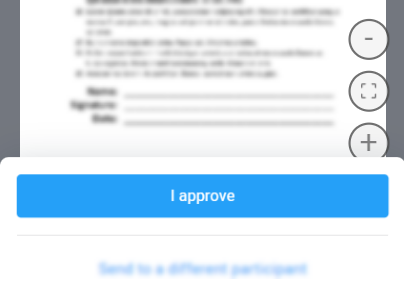
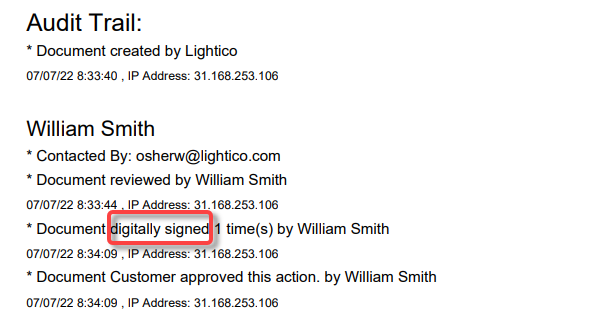
You can also customize some of the wording on the audit trail. For example, you can change "esigned" to "digitally signed".
In the Customizations > Wording page you'll find a table of all wording that can be changed in the UI and audit trail.
Outline
Here is an outline of the steps for customizing wording of the customer UI for a PDF Template:
Create a custom wording template
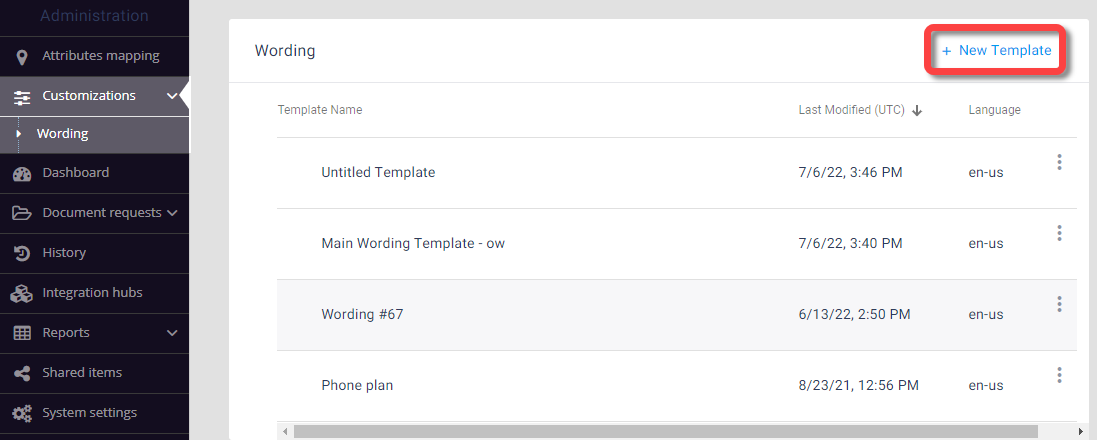
- In the Administration screen, go to Customizations > Wording and click New Template.
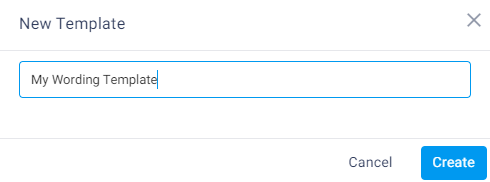
- Name the template and click Create.
The template configuration page opens with a table of all customizable UI and audit trail elements. - Add custom text to a field in the Value column.
- Delete the custom text to return to the System Default text.
- Click Reset to return to the last saved version of the text.
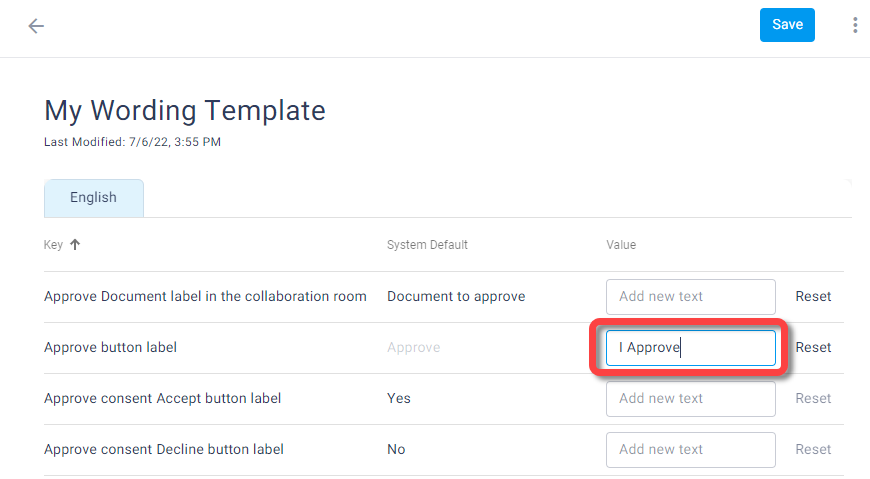
- After making all your changes, click Save.
The wording template is saved.
Note:
See Table of wording changes for a detailed description of the UI and audit trail elements found in the wording template.
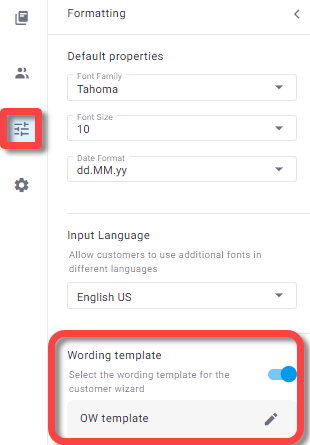
Associate the wording template to a PDF
For each PDF Template, you can select a wording template with its own unique wording. This wording template defines wording of the UI elements when this PDF Template is sent.
To associate the wording template to a PDF Template:
- In the PDF Builder formatting tab for the relevant document, turn on the Wording template toggle and select the template from the pop-up that appears.
Email and SMS invitations
Lightico enables you to keep customers engaged and updated about sessions, from inviting them into a session to sending them automatic notifications about session activity.
For example, if the agent sends a document to a customer and they have not yet completed it, Lightico can auto-send a reminder to complete the document. When there is new activity in a session, for example, the agent sent the customer a new document to sign and the customer is offline, Lightico can auto-send a notification about the new activity. You can also customize the content of email and SMS session invitations. These settings are found in the Administration pages under System Settings > Notifications.
For guidelines and best practices for writing SMS and email messages, see Customer notification guidelines.
Configure general notification settings
You can configure the following settings that apply to all notifications in the General section of the Notifications settings.
| Setting | Configuration instructions |
|---|---|
| SMS sender name | Enter the sender name that appears on an SMS sent by Lightico. For example, your company name. Note: This setting is only applicable to countries that allow sender name customization. |
| Phone prefix | Turn the toggle on to activate and select a calling code that will be added to the phone number the agent enters when starting a session. This allows the agent to enter the local number without having to add a calling code. If the agent enters a different calling code, that code will override the code selected in the settings. |
| Email sender name | Enter the sender name that appears on emails sent by Lightico. For example, your company name. |
| Short customer invite URL | Generates a short URL for including in the SMS and email session invitation. This increases readability and helps to stay within the 160-character limit for SMS messages. |
Customize session invitations
SMS content
Note
If you’re concerned that admins might change SMS content and cause regulatory issues, you can request Lightico customer support to disable them.
Long URL SMS content
Enter custom text for when you are using long URLs. Limit the message to 70 characters to ensure that it is not split into more than one SMS. This message will also replace the Short URL SMS content (see below) when the short URL service is not responding.
Short URL SMS content
Enter custom text for when you are using short URLs. Limit the message to 130 characters to ensure that it is not split into more than one SMS.
Email Subject
Enter custom text for the subject of the email invitation. For example, "You are invited to a Lightico collaboration room."
Email Body
Click Replace file and upload an HTML template used for the body of the invitation email. For guidelines to working with email templates, see Email template guidelines.
Additional settings for incomplete sessions and new activity can be found below.
Remind customers about incomplete sessions
If a customer has not yet completed a session activity, for example, the customer did not complete a document, you can send incomplete session notifications to remind the customer to complete the activity.
These reminders can be sent a maximum of one time per day. Configure the following system settings for incomplete session notifications:
| Setting | Configuration instructions |
|---|---|
| Customer offline duration | Define (in minutes) how long the customer should be offline before the notification mechanism is activated. Once notifications are activated, they will be sent out according to the other settings defined below (specific days and time range). |
| Days | Define on which days notifications can be sent |
| Time range | Set the time range for notifications to be sent. This should be set to a time when customers are most likely to be online and available to receive notifications. |
| Maximum notifications | Set the maximum number of notifications that can be sent to customers |
| Send via SMS | When the toggle is on, an SMS is sent according to the timing that is configured above. |
| Send via email | When the toggle is on, an SMS is sent according to the timing that is configured above. |
Notify customers about new activity
If an agent adds a new document or any item to a session or if the agent is the last person to sign on a document, thereby completing the document, you can send a new activity notification to the customer. This notification makes the customer aware that something is waiting for them in the room or that a document is ready for them to download. Configure the following system settings for new activity notifications:
| Settings | Configuration instructions |
|---|---|
| Activate new activity notifications | Turn this toggle on to send notification of new activity according to the settings below. |
| Customer offline duration | Define (in minutes) how long the customer should be offline before a notification about new activity is sent. |
| Notification frequency | Define (in minutes) the frequency at which notifications can be sent. Note: If the frequency is set at 10 minutes and there is an activity 2 minutes after the last notification, the customer will not receive that notification. |
Workflow customization
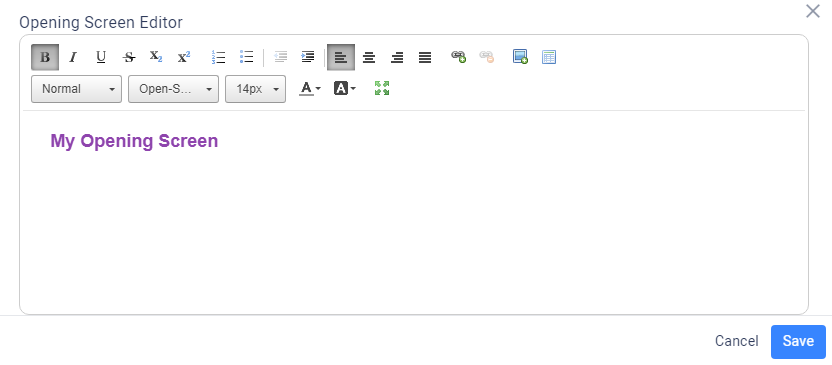
Customize opening and closing screen
You can display a custom opening or closing screen for your Workflow.
To customize the Workflow opening or closing screen:
- In the Formatting tab, turn on the Show opening screen or Show closing screen toggle.
- To customize the screen, select Custom screen and, in the Screen Editor, customize your screen using the built-in WYSIWYG editor.
- Click Save.
Define workflow background
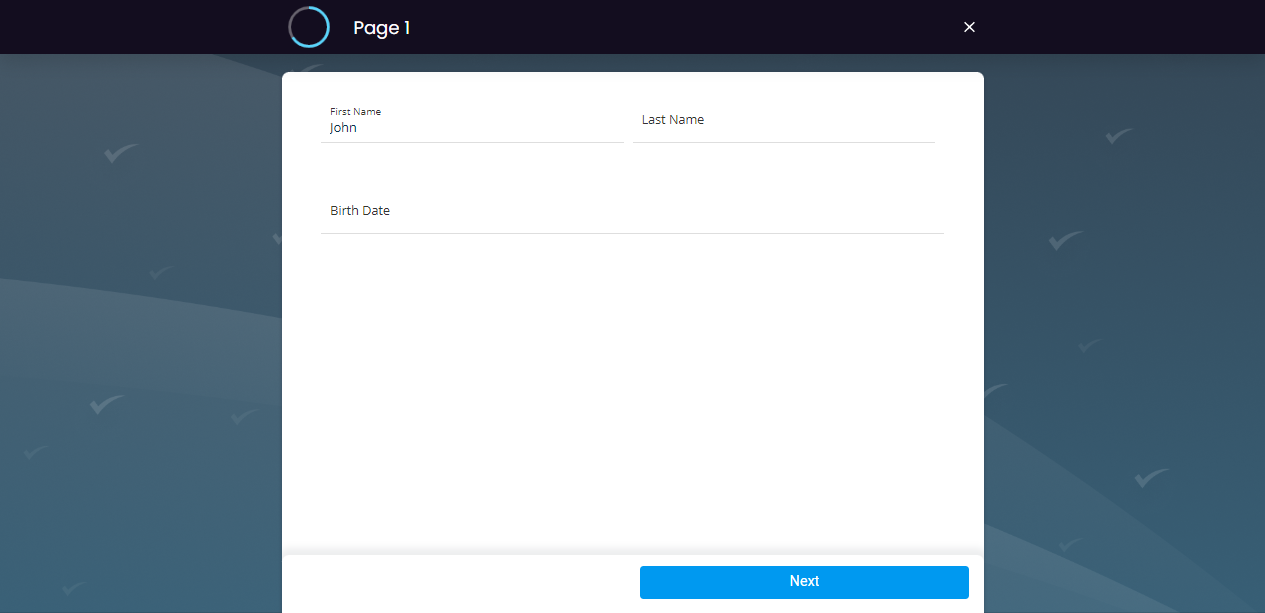
Add a background that appears behind customer forms when they participate using a laptop or desktop device. The background can be an image or color.
To define a color for the workflow background:
- In the Formatting tab, under Workflow background, click Color and enter the Hex color code in the field below.
The defined color is displayed in the preview box.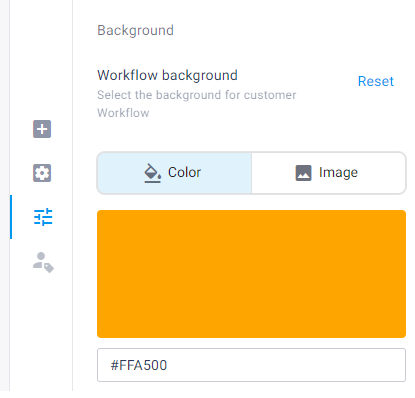
To define an image for the workflow background:
- In the Formatting tab, under Workflow background, click Image.
The default image appears in the preview box. - Click Replace Image and select an image from your files.Note:The image file size must not exceed 2Mb.
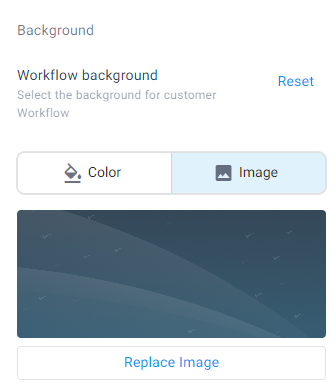
The selected image appears in the preview box.Note:Click Reset to return to the default color and image.
Localization
Language
To change the language of the agent and customer interface:
In the System settings, go to Format and design > Language and select the desired language.

Time zone
You can define a time zone that affects the displayed time in the following areas:
The Signature date and time field in documents.
The Audit trail included as part of Lightico documents.
The same time zone is also used when you configure notifications about incomplete sessions.
To change the time zone, go to System settings ⇾ Session ⇾ Preferences, click Edit, and select the relevant time zone from the list.